Pages

Tuesday, May 30, 2017

Infrared Photography: Getting More Color From Your 720nm Filter

I recently decided to upgrade from my current infrared-converted Nikon D7100 to a Nikon D7200, taking advantage of Kolari Vision's Anti-Reflective coated glass (article to follow). In the process, I once again considered my filter choices. Although I had some decent results from a 665nm filter from another infrared conversion house, I was not satisfied with the overall results and had Kolari Vision swap the 665nm out and install a 720nm filter. I always thought the 720nm filter provided the best overall balance of bright white vegetation and false color processing capabilities, but admit suffering from occasional bouts of ICE – Infrared Color Envy. Some of the photos taken with the 590nm filter are… well… rather gaudy. But I have also come across some that are jaw-droppingly gorgeous.

I have occasionally found ways to boost the false colors of my 720nm photos and have seen an extra splash of color from others using the same filter. Before settling on the 720nm filter (again), I decided to challenge my preexisting notions regarding the 720nm's ability to process false colors. Hence the question: Is it possible to consistently and reliably coax more color from my 720nm IR filter?
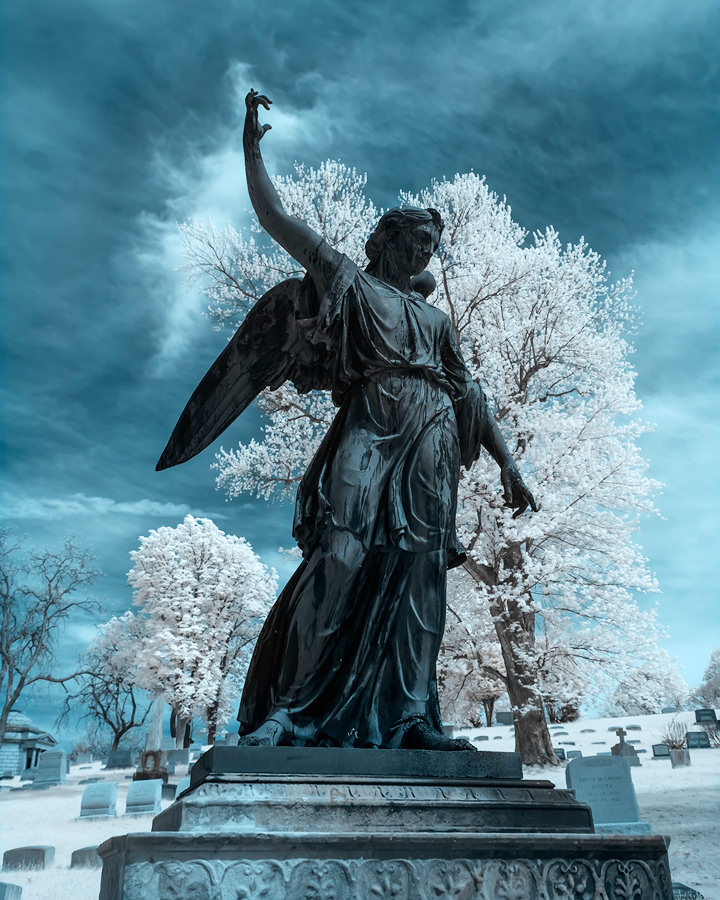
1) Background

My current D7100 / Kolari Vision 720nm IR filter combination provides great results, but the false colors are rather limited, apart from the blues. The series below is representative of my standard 720nm processing technique.

RAW File With Custom Lightroom Profile:

RAW File

RAW File

RAW File

Here is the image after using my False Color Preset in Photoshop:

Standard IR Process

Standard IR Process

Standard IR Process

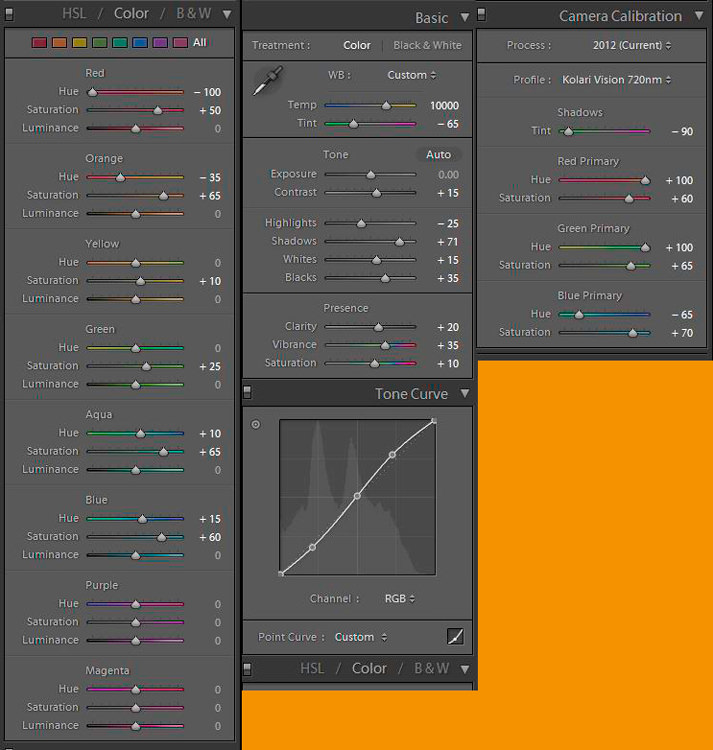
Here are the settings I used to create this image:

Channel Mixer Properties

Channel Mixer Properties

Channel Mixer Properties

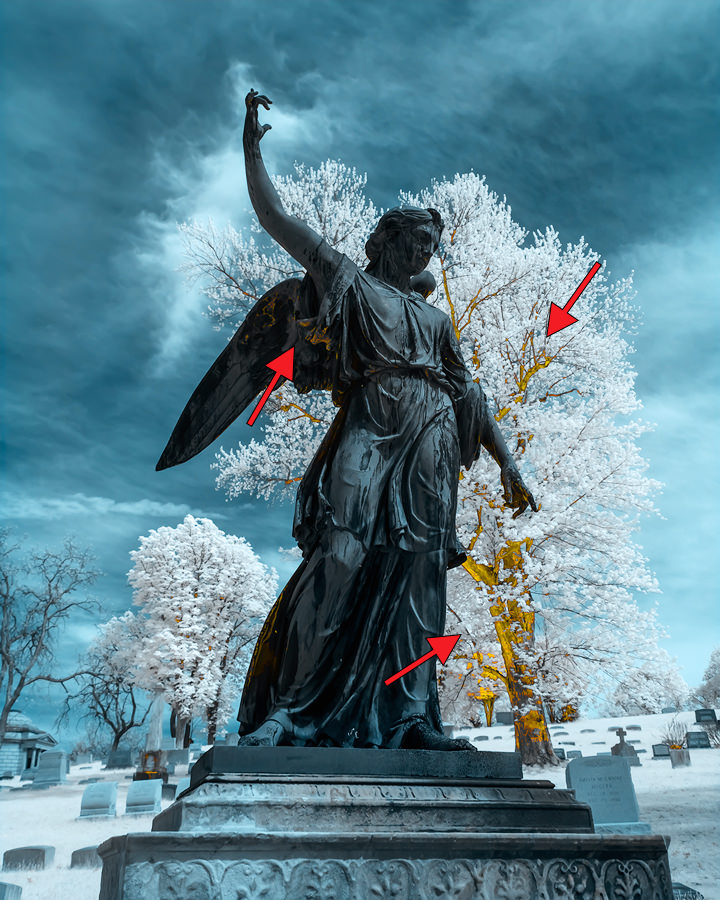
As you can see below, pushing the Yellow Slider in the Hue/Saturation Control does very little to the color of the vegetation. Admittedly, I could change the White Balance setting to increase the yellow saturation, but I happen to like this look:

Standard 720nm Process - Yellows Pushed To Max

Standard 720nm Process - Yellows Pushed To Max

Standard 720nm Process – Yellows Pushed To Max

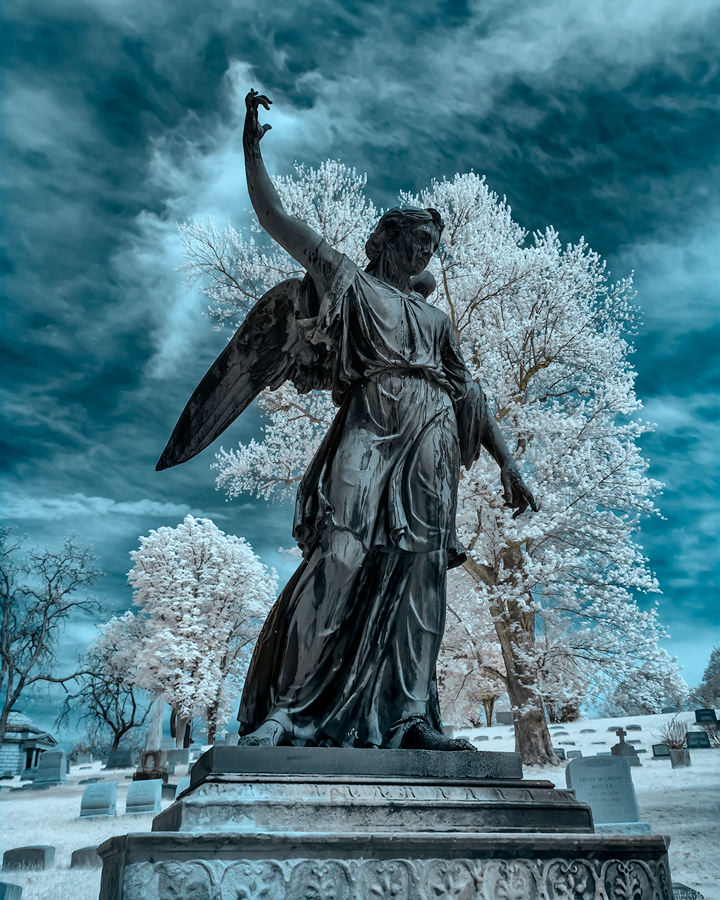
Here is the final image after a layer of SilverEfex using the Luminosity Blend Mode in Photoshop. I find this look quite appealing for most of my IR photography:

Final Image

Final Image

Final Image 2) Infrared Filter Selection

As you can see from Kolari Vision's filter guide (other conversion companies' filter examples are similar), fans of brightly colored IR photos will likely opt for the 590nm. There is little to suggest the 720nm might also yield some of the same splashy colors as the 590nm filter. These charts also show the relative ease of getting good whites out of any of the filter choices (e.g. "How To Make Your 590nm Super Color Filter Images Look Like They Were Taken With A 720nm Filter"):

Kolari Vision Filter Examples

Kolari Vision Filter Examples

Kolari Vision Filter Examples

Charts such as the one above should always be considered as general guides. Different vegetation reacts differently to IR light. In some cases, it is nearly impossible to affect the color of some vegetation, even after desaturating and boosting the luminance associated with the yellow slider in Photoshop's Hue/Saturation Control. If you have taken IR photos of evergreens, you know what I mean.

Of course, the beauty of any IR filter lies in the eyes of the beholder, particularly if he/she is paying for the conversion. Each IR filter represents a trade-off (more false color options / duller whites or brighter whites / less false color options). The trick is finding out how to produce the widest latitude of results for the IR filter of your choice and quickly adjust your IR workflow process as needed.

3) IR Frustrations and Challenges

Since I began writing for Photography Life, I have received a few hundred emails from those experimenting with IR photography (including a few from our founder, who later on ended up converting his Nikon D800E). Many expressed frustrations with white balance settings, post-processing techniques, lack of information about a lens' IR performance, and achieving consistent results under varying conditions. The post-processing frustrations often arise because of the subtleties of working with IR images. You can make some fairly sizable changes in using the Contrast, Vibrance, Blacks, Whites, and other slider controls in Lightroom and Photoshop, without affecting a photo very much. But even small changes in White Balance or Photoshop's Channel Mixer settings (the two most critical settings for IR processing) can have huge impacts on the final image.

As a reminder, your specific IR results will vary based on a combination of:

  • Individual camera make/model
  • Camera sensor
  • Infrared filter wavelength
  • Infrared filter manufacturer (there may be variations between vendors)
  • Whether you shoot RAW or JPEG
  • Your camera's processing engine
  • Lens used (different lenses may react differently to IR light)
  • Type of vegetation and its ability to reflect IR light
  • White balance settings
  • Quality, combination, and wavelengths of infrared and visible light
  • The steps and sequencing of your IR processing workflow
  • Because the White Balance and Photoshop's Channel Mixer settings work with one another and very small changes can have huge impacts, finding a combination of settings (outside the standard Red/Blue Channel Mixer Swap and standard White Balance) that produce desirable results can be challenging and time-consuming. Unfortunately, you cannot judge the results of changing these settings (at least not without some practice) until you have completed your IR processing routine.

    Given some people's frustrations with IR processing, it is not surprising once they have made their filter choice, they develop a set routine for processing IR images within a given range of false color choices (per the "Selecting a Filter" guidelines) and accept the inherent trade-offs depicted by the IR conversion companies' filter guides. I suspect few but the die-hard IR enthusiasts go back and tinker with a formula once they have found one delivering consistent results.

    I use a combination of Lightroom and Photoshop to process IR photos and rely heavily on Presets and Actions because they can significantly speed image processing and make it easier to experiment. I strongly suggest saving Camera Profiles, White Balance, Channel Mixer, Hue/Saturation, and other settings once you find some that work for you. Once you have these various settings stored, you can make minor changes to understand how each affects the overall image quality. And when you find a new variation? Save it as new Preset and incorporate it into another Action.

    4) Turning On The 720nm's Color

    Back to the question at hand: Is it possible to consistently and reliably coax more color from my 720nm IR filter?The short answer is: yes. The slightly longer answer is: yes, but it may take some experimentation on your part to develop a consistent formula yielding the results shown below for your specific camera and IR filter.

    4.1) The Starting Point – White Balance

    The first step is shooting in RAW and having a Solid White balance setting in your camera. The next step is creating a White Balance setting in Lightroom with enough latitude to mimic the White Balance setting in your RAW file (assuming you are using Lightroom for managing your photos). I covered this in a previous article on post-processing infrared photographs.

    4.2) The Base Image

    Following are the Lightroom settings used to create what I refer to as my "base" image for maximizing the color capabilities of my 720nm IR filter:

    Base Image Lightroom Settings

    Base Image Lightroom Settings

    Base Image Lightroom Settings

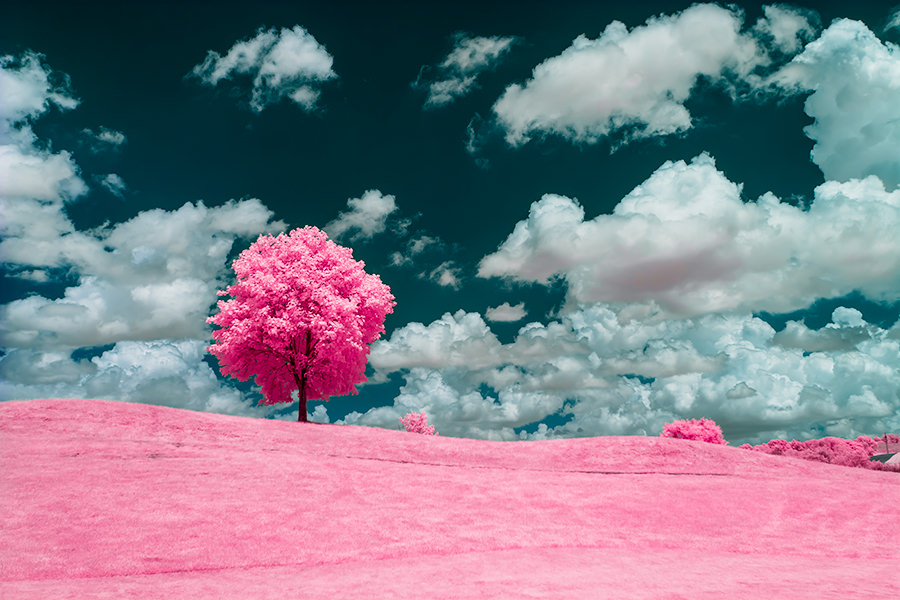
    I nicknamed this effect "Southwest":

    Southwest

    Southwest

    Southwest

    I am confident if you can process your RAW file to look similar to this one, you can adjust it to achieve the results in 4.3. I know because one of our readers sent me a JPEG file, which I was able to tweak to look fairly close to my Southwest photo. I simply ran my other Photoshop actions and the resultant images looked quite close to those below.

    4.3) Modifying The Base Image

    The following image was created by running my Channel Mixer settings (above) with some Hue/Saturation presets in a single action against the Southwest base image. I refer to this one as the "720nm Goldie" because it looks very similar to the results from the 590nm Goldie filter:

    720nm Goldie

    720nm Goldie

    720nm Goldie

    I created this image, "Cotton Candy," by taking the Southwest image and applying another Hue/Saturation preset. This is another popular look produced by the 590nm filter:

    Cotton Candy

    Cotton Candy

    Cotton Candy

    I created the last image, "Sour Apple," by taking 720 Goldie and applying another Hue/Saturation preset. I don't see this style quite as often, but some 590nm photos feature some very pleasant green tones:

    Sour Apple

    Sour Apple

    Sour Apple

    Thus with a few Presets and clicks, I am able to process the base image in many different ways, limited only by how much time I choose to tinker with each photo.

    4.3) Noise

    You always need to keep an eye on noise when you start swapping colors and changing hue and saturation. I looked at the histograms and zoomed in quite often to determine if any of the associated changes were negatively impacting photo quality. I was surprised to find this technique did not increase noise levels. Nor did I do any serious damage to the histograms. I clipped some colors, but with infrared processing, I do not typically worry about it. I compared the image quality results with those produced by my standard 720nm processing technique and noticed little if any difference.

    100%-Crop

    100%-Crop

    100% Crop 5) Summary

    Can the 720nm filter mimic the 590nm completely? No. The 590nm filter will produce different results based on it allowing additional visible light to reach the sensor. The 590nm filter will also handle portrait photography much better than the 720nm filter. Can the 720nm filter mimic some of the results you often see with the 590nm filter? In some cases, the 720nm filter will come quite close. Will this technique work for all IR photos? Probably not, but it may work for some.

    If you like the traditional false color processing results of the 720nm filter but have an occasional desire to add an extra dose of color to your IR photos, the technique outlined can help, particularly if you are willing to experiment and have some patience.
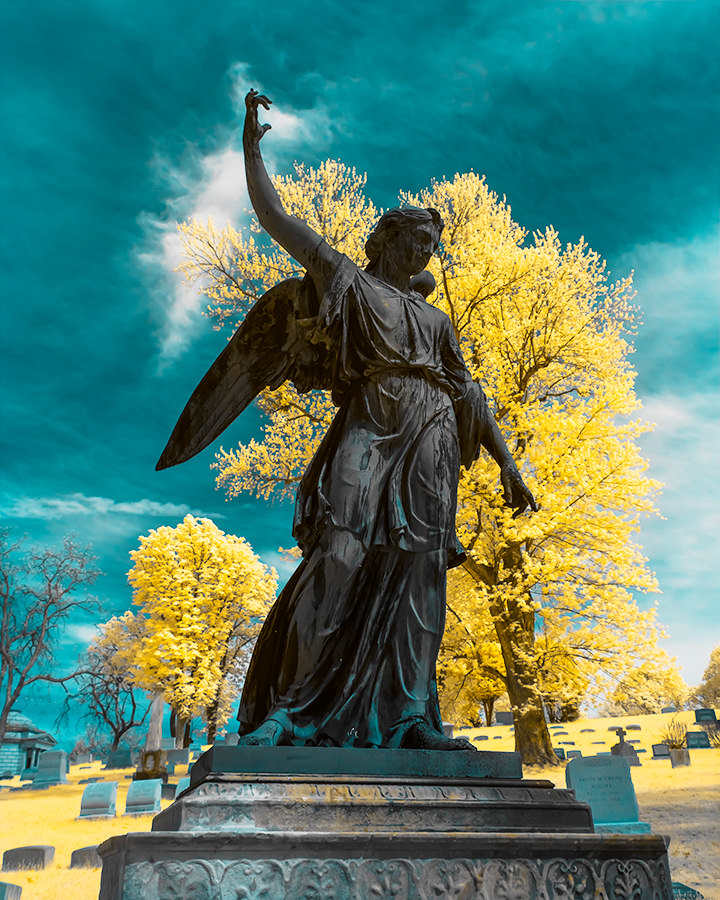
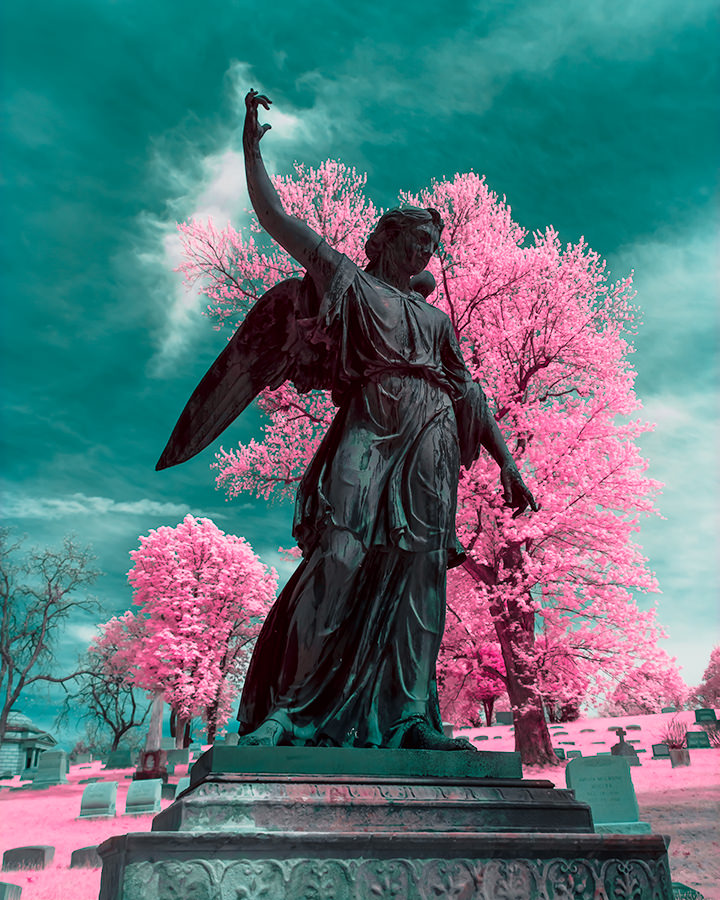
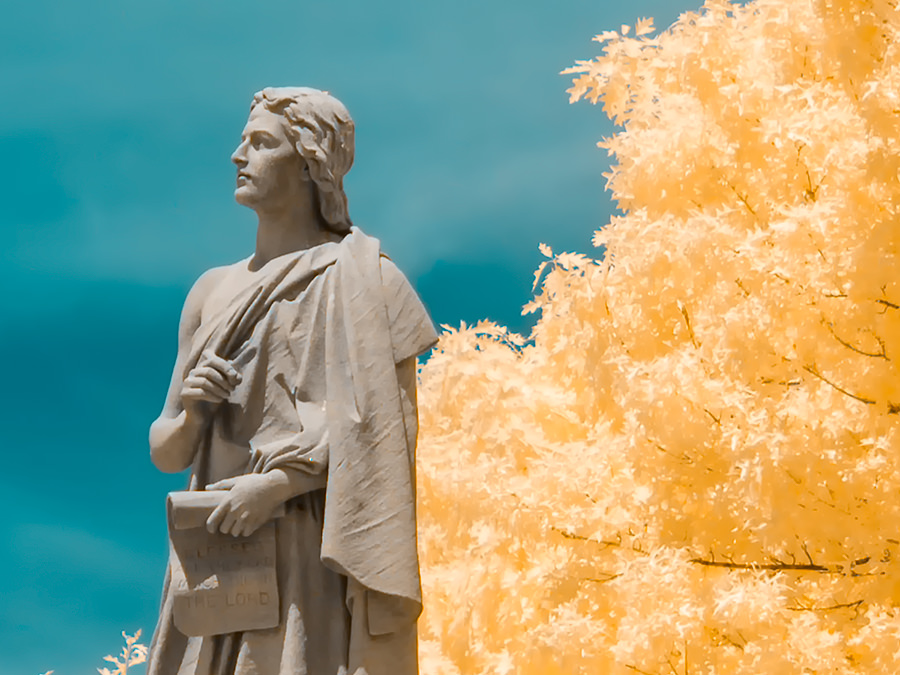
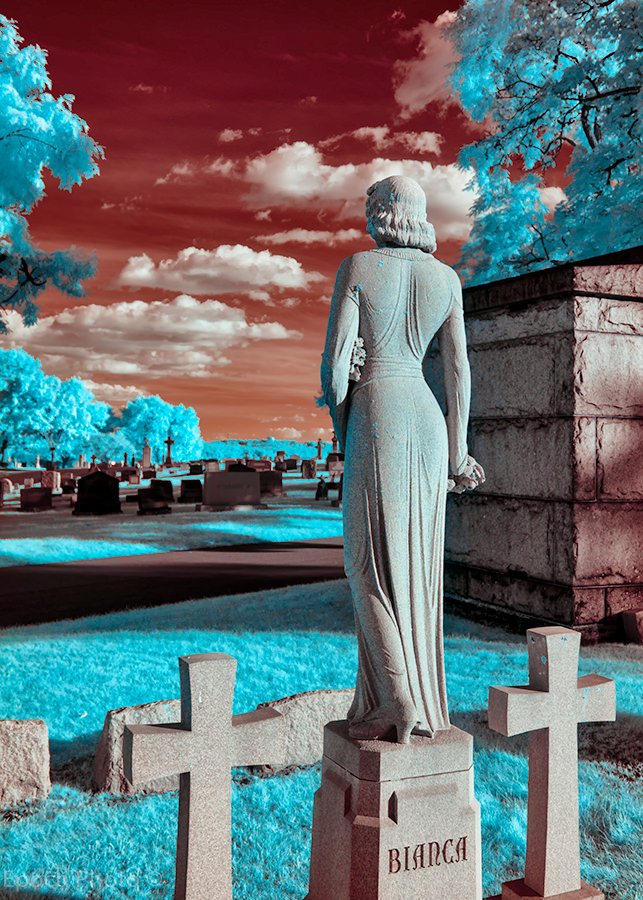
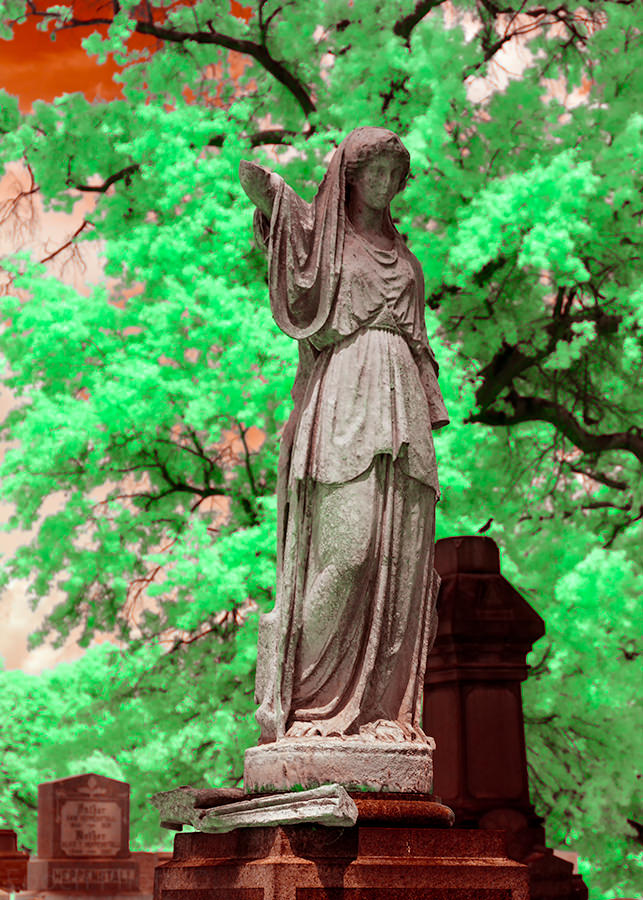
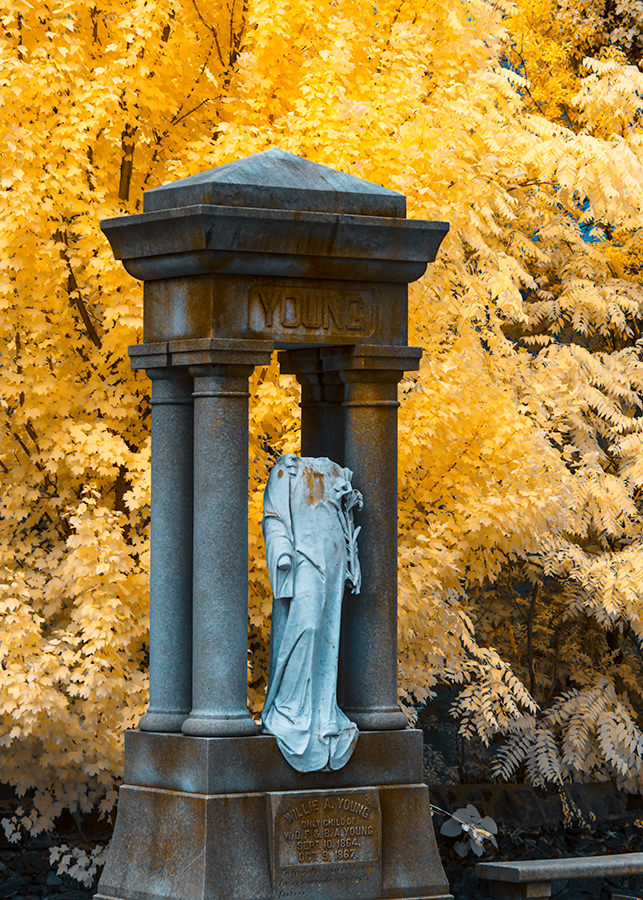
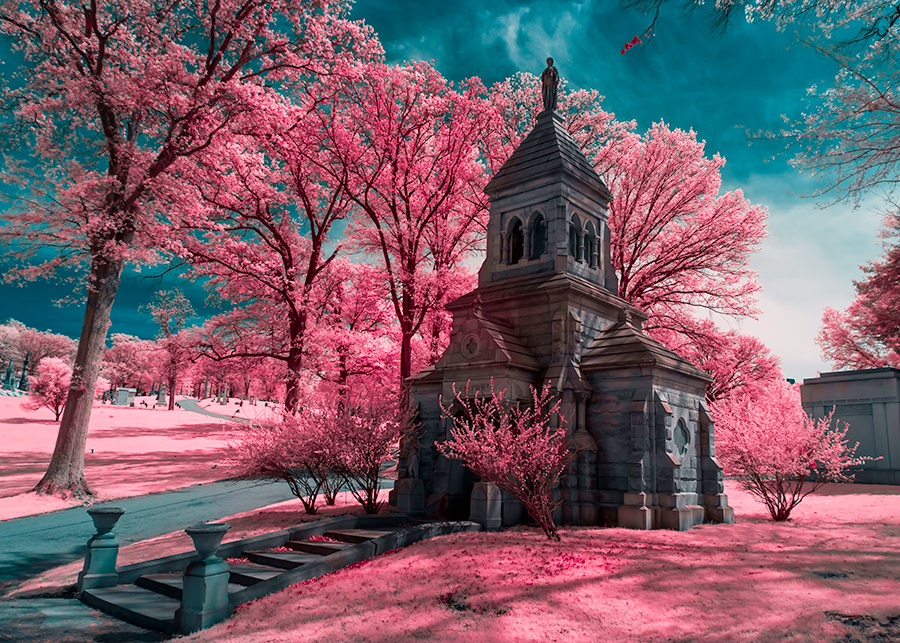
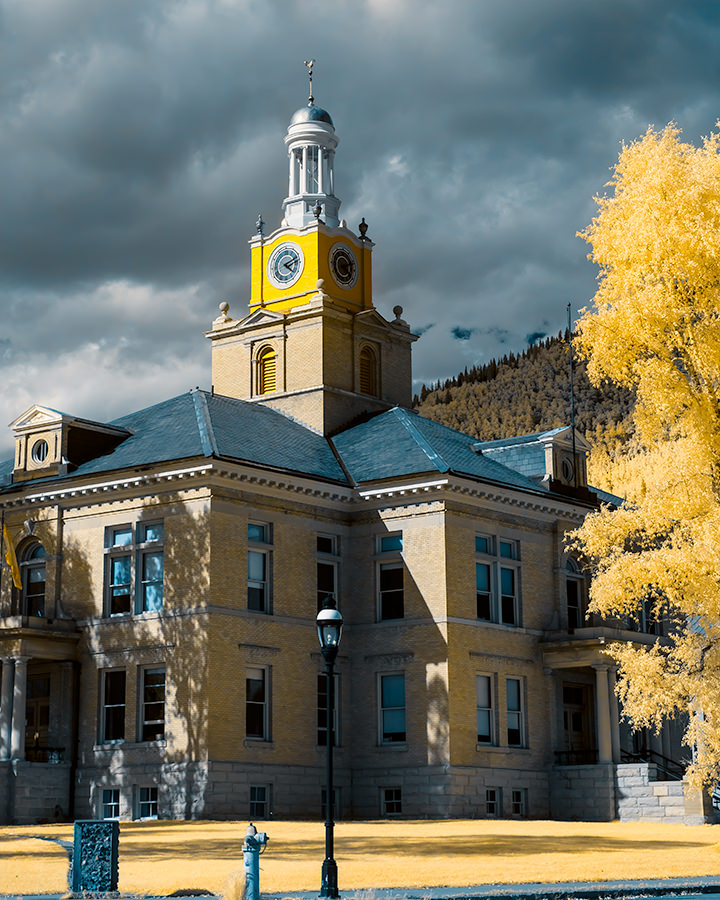
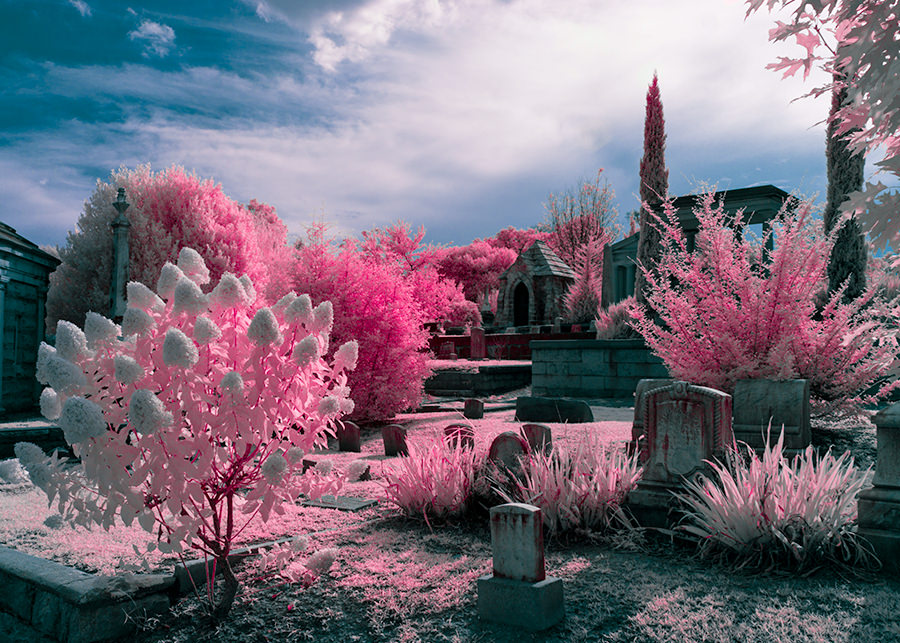
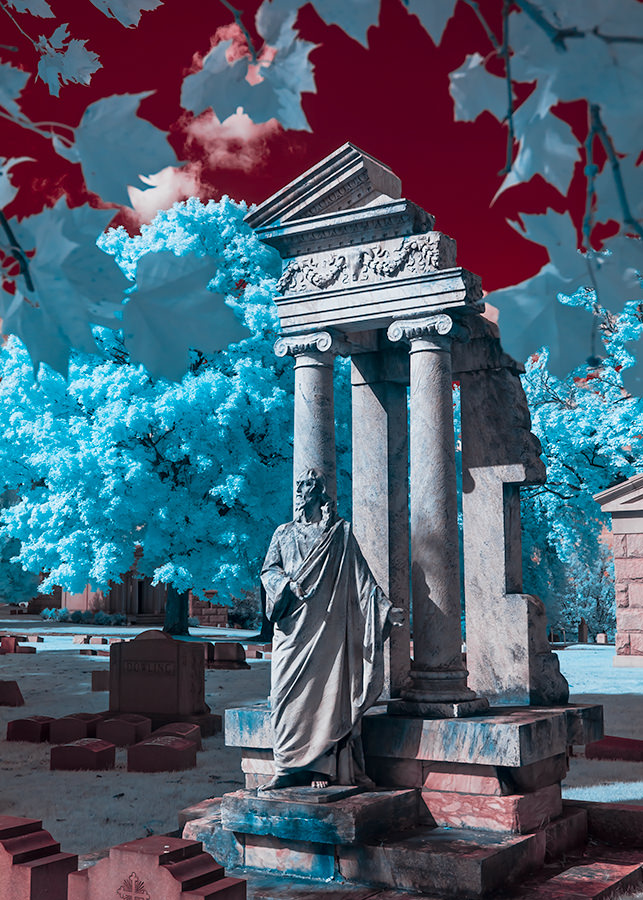
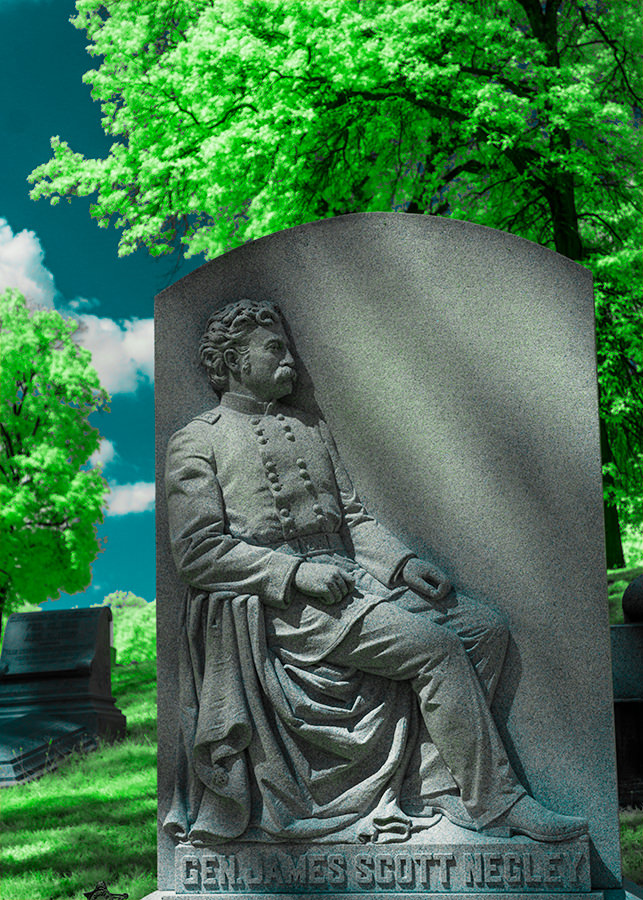
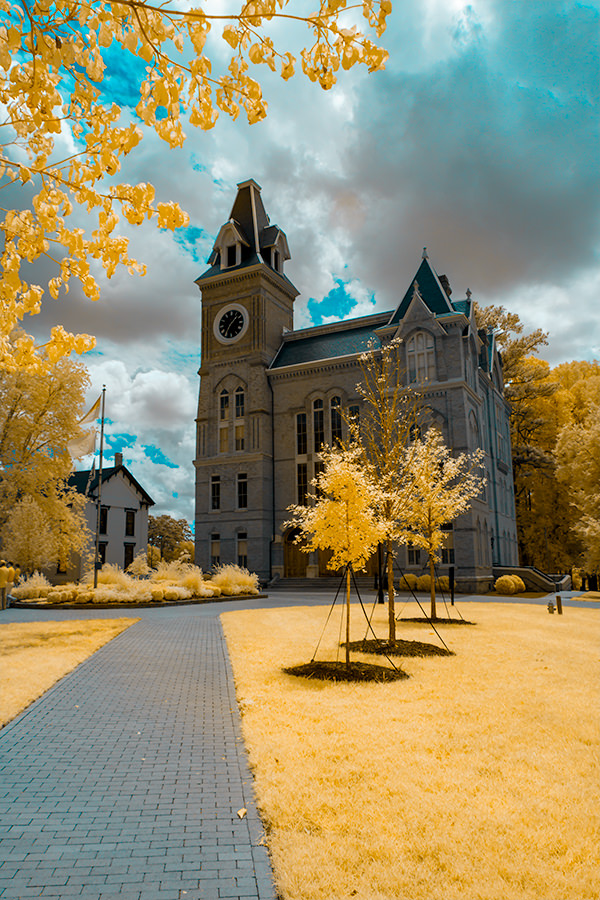
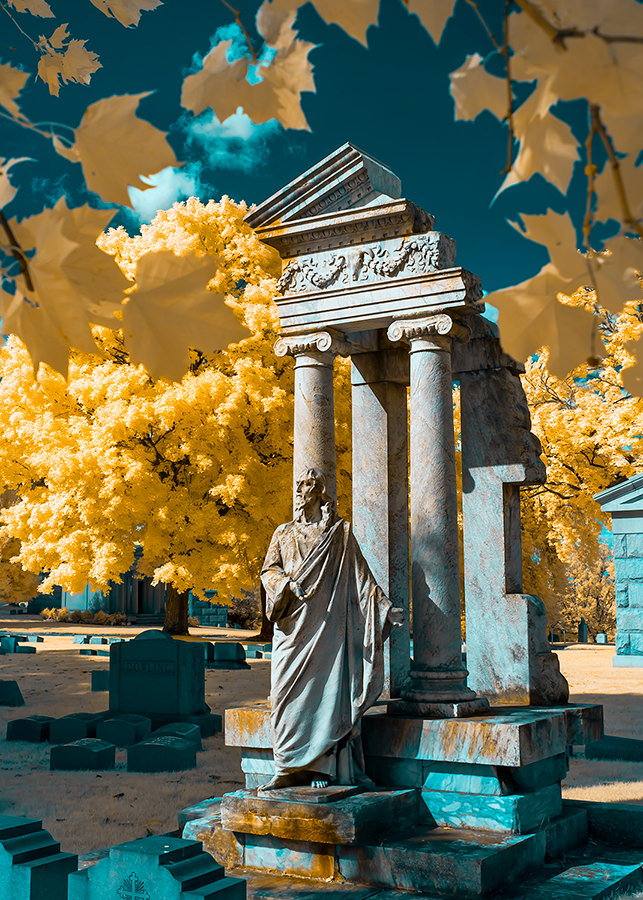
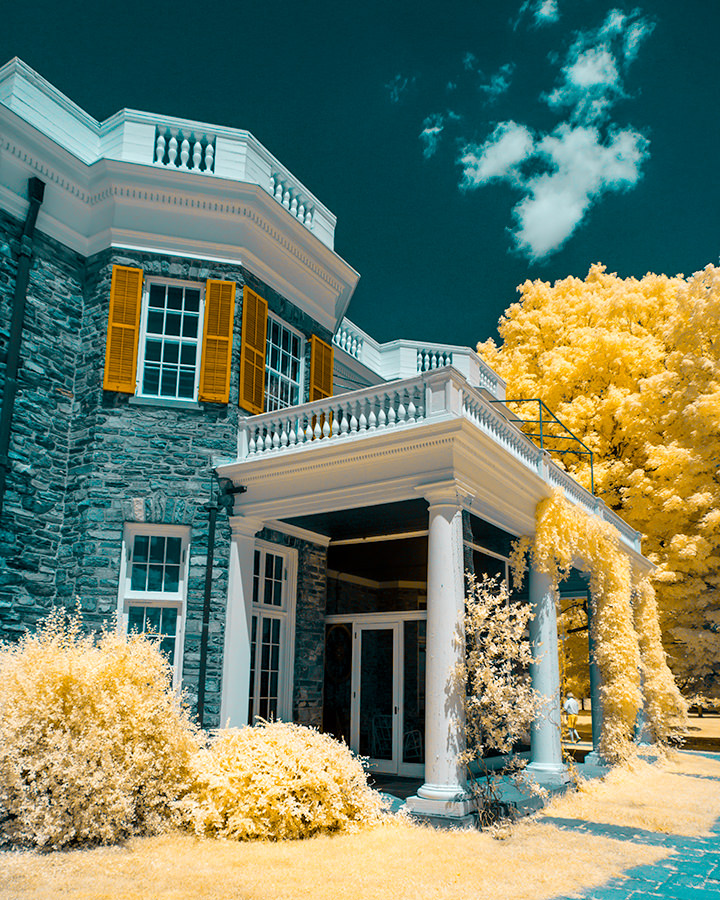
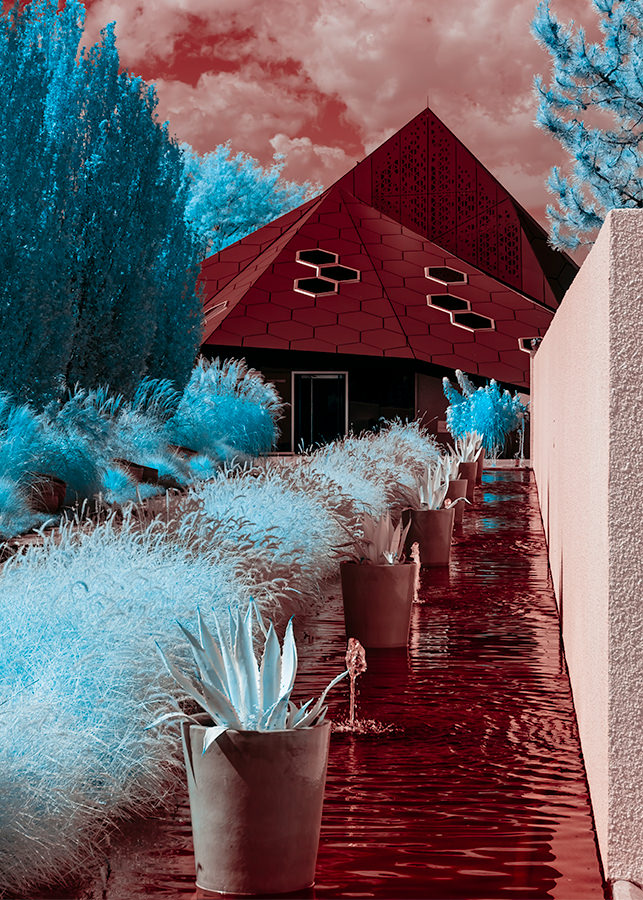
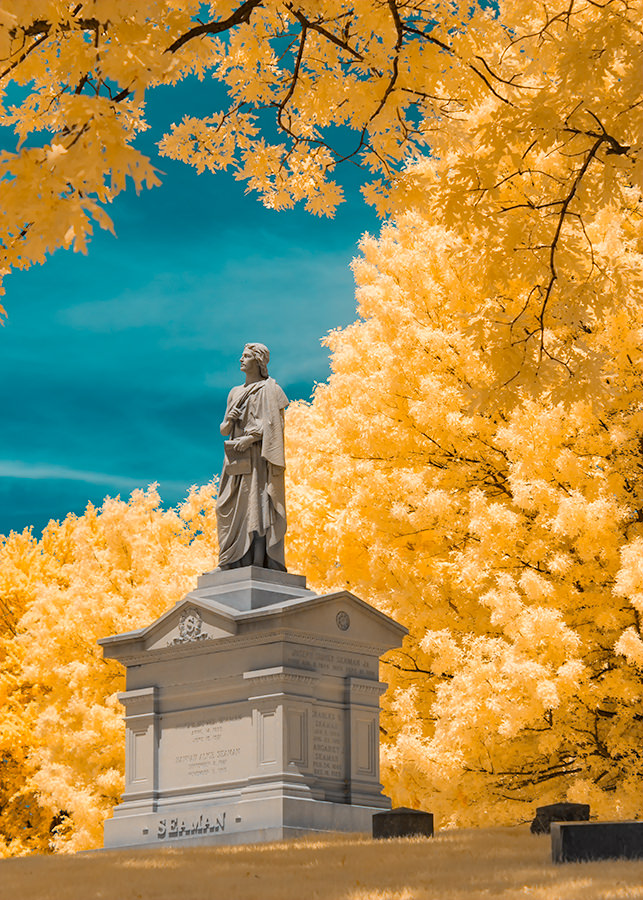
    6) Some Other Examples

    Following are a variety of photos I processed and modified using the technique above. As you can see, the 720nm is capable of producing significant false colors:

    Ouray

    Ouray

    Ouray Bianca

    Bianca

    Bianca Homewood Cemetery

    Homewood Cemetery

    Homewood Cemetery Oakland Cemetery

    Oakland Cemetery

    Oakland Cemetery Ford Mausoleum

    Ford Mausoleum

    Ford Mausoleum Silverton

    Silverton

    Silverton Red Rock Stadium

    Red Rock Stadium

    Red Rock Stadium Oakland Cemetery 2

    Oakland Cemetery 2

    Oakland Cemetery 2 Calvary Cemetery Statue

    Calvary Cemetery Statue

    Calvary Cemetery Statue General Negley 2

    General Negley 2

    General Negley 2 Oxford College

    Oxford College

    Oxford College Birdsfoot Golf Course

    Birdsfoot Golf Course

    Birdsfoot Golf Course Denver

    Denver

    Denver Calvary Cemetery 2

    Calvary Cemetery 2

    Calvary Cemetery 2 Denver 2

    Denver 2

    Denver 2 FDR's Mansion

    FDR's Mansion

    FDR's Mansion Denver Botanical Gardens

    Denver Botanical Gardens

    Denver Botanical Gardens Cooke Statue 2

    Cooke Statue 2

    Cooke Statue 2 Airplane Engine

    Airplane Engine

    Airplane Engine Homewood Cemetery 3

    Homewood Cemetery 3

    Homewood Cemetery 3

    Have you ever experimented with infrared photography? Please share your thoughts and feedback in the comments section below.


    Source: Infrared Photography: Getting More Color From Your 720nm Filter

    Saturday, May 27, 2017

    An Introduction to Shooting and Processing Infrared Photographs

    If you've never shot in infrared before, it can be a fun way to look at the world in a different way. This helpful video will show you the different ways to get up and running shooting and the basics of post-processing.

    Coming to you from Anthony Morganti, this helpful video is a great primer on the subject of infrared photography. There are three ways to get into the genre: purchase a purpose-built camera (of which there are few), use an infrared filter, or have a camera converted. I personally don't recommend using an infrared filter. Modern cameras have an infrared-blocking filter in front of the sensor that lets very little of that part of the spectrum through, and the infrared filter simply blocks visible light to allow wavelengths in the infrared region enough time to accumulate on the sensor without it being overwhelmed by visible wavelengths. The problem is that because the blocking filter is still there, it takes a long time for this to happen, making for long shutter speeds. I personally had my first DSLR, a Canon T3i, converted by Life Pixel (I went with the Super Color IR option), and I love it. Infrared photography has some weird quirks that you have to get used to, and Morganti does a great job of explaining them (pay particular attention to channel-swapping if you want to get the look often seen online). I personally love shooting infrared, and it always gets the creative juices flowing. 


    Source: An Introduction to Shooting and Processing Infrared Photographs

    Thursday, May 25, 2017

    Springtime in the Rockies

    Posted on May 25, 2017 in Featured, Panasonic

    Today's Post by Joe Farace

    "When it's springtime in the Rockies, I'm coming back to you…"—Gene Autry

    While the deciduous trees here on Daisy Hill are not fully blooming due to a recent snowstorm (see my video clip on Instagram —@joefarace) and unseasonably cold weather early in the Spring, the trees in nearby Parker, Colorado are beautiful, which means it's time for some infrared photography.

    So recently I drove down to McCabe Meadows open space, formerly known as East Bank Park, that has some  bike paths, picnic benches and even a rest room plus some great off-path walking areas where I made the above image with a Panasonic Lumix G5 that was converted to IR-capture by LifePixel. Lens used was the Lumix 12-32mm f/23.5-5.6 ASPH and I made the image you see above with an exposure was 1/500 sec at f/11 and ISO 400. It was shot as a RAW file but was process to produce the inal image using Silver Efex Pro.

    McCabe Meadows, like much of the Parker area, is filled with friendly people. Shortly after arriving a group of people from a nearby church offered me a bottle of water to keep hydrated during my walk. As I said, nice people…

    If you're interested in trying infrared photography, check out the series of IR Workshops sponsored by our sister blog, 'Saving the World, One Pixel @ a Time' to be held near Parker, Colorado this summer. Check the Workshops section of that blog for updates.IR.book

    My book, The Complete Guide to Digital Infrared Photography is currently out-of-print but used copies are available from Amazon for under $15. Creative Digital Monochrome Effects has a chapter on IR photography and is available from Amazon with new copies under $6 and used copies for less than three bucks.


    Source: Springtime in the Rockies

    Wednesday, May 24, 2017

    Color Infrared For Landscape And Urbanscape

    2017-05-24 1 Share

    A long-time fan of plastic cameras, Argentinean writer and photographer Lorraine Healy is the author of "Tricks With A Plastic Wonder," a manual for achieving better results with a Holga camera. In this article, Healy explores the world of color infrared film and its somewhat steep learning curve.

    A different look at reality through color infrared 35mm film. The South Dakota Badlands (left), downtown Buenos Aires (center), and Greenbank farm on Whidbey Island (right).

    After the fabulous article published in October of 2010 by @lazybuddha, about his equally fabulous Aerochrome images, is there anything left to say about shooting color infrared film? @larslau published another great article in 2009 and had an excellent comparison of how the color infrared behaved if developed in C-41 chemistry as opposed to E-6, plus if you were ever curious about what a portrait taken with color IR film could look like, your prayers were answered.

    An abandoned homestead near Hayes Center, Nebraska. Pentax K 1000 +R25 filter.

    Why do I revisit the topic? Well, this type of film went away sometime after both articles were published, and then a couple of years ago that lovely troupe of film idealists known as "The Film Photography Project" found a whole bunch of the film somewhere, and started rolling it by hand and selling it in 35mm format. The price per roll varies, from special offers of $20.99 per roll to the usual $28 per roll. So, cheap it is not! There is a learning curve to using it, too, so you can plan on throwing away the first 2 or 3 rolls you shoot. You also need at least one filter on your camera lens, which can be a red R25, a 12 yellow, a 40 orange, or one called Wratten 87B/89C—all still available in every thread size.

    Nebraska. Pentax K 1000 +R25 filter.

    Because color infrared is so light-sensitive, it will only work on cameras that don't have the little windows that allow you to see what film you have in it. Those solid SLRs and rangefinders from the past--the Minoltas, the Pentax, the Canons A and AE-1, the Nikon F2, Olympus Pens, and of course Leicas -- are the cameras that will work the best with this film. FPP rates it at ISO 400 and suggests it be shot at f16, in open sunlight, with one of the filters I mentioned before on your lens. They say if it is not really sunny, don't shoot it! Like we say in Spanish, "no se luce"; its beauty won't show, it can look pretty muddy.

    Shot in Buenos Aires, somewhat overcast conditions, certainly not open sunlight. Muddy, uninteresting, not a good shot. Pentax K 1000 +R25 filter.

    B&W and color infrared (IR) photography started out as a non-artistic medium, with its applications being military aerial observation, forestry development, and mapping. The person who really put color IR photography on the artistic sphere is Irish photographer Richard Mosse (Take a long look at his website. In our own Lomo world, I have been swept away by the color infrared images of @furn7973, who is probably Irish too, since he lives in Clifden, Ireland. Run to his LomoHome, friends! His color IR panoramas are something to behold.

    Plenty of light, foliage, a white building turned this shot in La Boca, Buenos Aires, into the perfect color IR vision: the green foliage turns bright red, the sky goes dark (as it does with B&W IR photography), pleasantly unreal!

    There are many websites and books that deal with the technical side of infrared light, infrared photography, and color infrared photography in particular. My idea of writing this article is to try to give you as much practical information as I can about how to shoot the color infrared film that is still available and to share my experiences with it so that hopefully you won't have to throw away those first two or three rolls.

    Admiralty Beach in Central Whidbey Island, shot with FPP's Holga K280 modified with a yellow filter.

    I got my first few rolls of FPP's color IR film about this time last year, and then had to wait patiently until we got enough sun here in the Pacific Northwest to merit trying it out. In late July I went to the Palouse region of Washington State, my paradise of bright light, wheat fields, and crumbling barns and got…NOTHING. Not a thing. I had put the film through my Pentax K 1000, it clearly had not loaded well, and by the time I had "shot" past frame #29 (of a 24-frame roll) I realized I had a big problem. The gang at the Film Photography Project cautions users to be careful about not going past frame #24, this being a hand-rolled film and therefore a bit less hardy in handling compared to film that has been machined into place by Ilford or Fuji or Kodak. So, here is one of the steps of the learning curve: This is hand-rolled film, it needs to be loaded and unloaded in darkness (I use my changing bag), and it needs to be loaded and unloaded carefully. Make sure those spr ockets are securely in place and moving smoothly!

    Jammed! Two (or four, depending on how you look at it) frames from my jammed roll. Pentax K 1000 + R25 filter.

    I then took four rolls of FPP's color IR film on my 18-state, three-week road trip last Fall. I used a red R25 filter and got great joy out of three of my four rolls—one jammed and advanced haphazardly until frame #4, but by then I decided to cut my losses, rewound it, and kept it out of the light. I got four pretty crazy shots out of it! But the other three rolls… I was hooked! Some of the landscapes I went through, like the Badlands of South Dakota, the flat terrain of central Nebraska, the shimmering aspen in the heights above Flagstaff, Arizona, the New Mexican desert became even more magical when shot in color IR.

    Two shots of the "urbanscape" of Buenos Aires. Pentax K 1000 +R25 filter.

    Seeing how decidedly well the film had worked for landscapes, I wondered what it would do in an urban environment. Since I knew that Buenos Aires in February and March has all the bright light one can want, I took some rolls down South with me. I shot these images in the La Boca neighborhood of Buenos Aires and then downtown. Not having finished the roll, I took it out a different day when I was hunting for street art in the Coghlan area, but it was slightly overcast and had less open sunlight. I think the results show exactly why the Leslie Lazenby of the FPP says not to shoot in anything but open sunlight (So, no shooting into the sun either, or in less than really bright conditions).

    A very "blah" image shot under less than perfect conditions. This film is very scarce and is quite expensive, it would be ideal to save each shot for when the light is really perfect. Pentax K 1000 + R25.

    One thing I had noticed, when looking at other photographers' color IR work, was that some of them had a different tonality to them, really blue instead of the more green hue of the ones I was shooting. I realized that the color of the filter used might have something to do, something that I recently confirmed by buying the FPP's new Holga K280 MOD camera—a 35mm Holga sporting a wide 28mm lens, plastic everything, point and shoot. Michael Raso carefully cuts up yellow filters and gaffers them in place, and voilà, here you have the perfect IR point-and-shoot camera; it works great with B&W IR too. Here are some examples of the same film stock shot with a yellow filter:

    FPP's Holga K280 modified with a yellow filter. Admiralty Beach, Whidbey Island, WA.

    To be truthful, I cannot decide which look I prefer, the film shot with the red or the yellow filter, the bluer or the greener. I really like the stark blues, reds, and whites of the images shot with the yellow filter. But when I look at the shot below, of the Badlands, I see a lot more gradations and subtleties in the color range. Of course, that could be the difference in the camera lenses: a pretty decent 28mm f2.0 on the Pentax (below) versus a plastic p&s. Then there is the orange filter, which I purchased but haven't tried yet. Stay tuned!

    Badlands, SD. Pentax K 1000 + R25.

    NB: I try to research absolutely everything I write about, but I am not a technical photographer, so mistakes or erroneous statements might slip by inadvertently. If you notice some technical mistake, please send me a message! Thanks so much.

    Lorraine Healy (@lorrainehealy) is an Argentinean writer and photographer living in the Pacific Northwest. A long-time fan of plastic cameras and she is the author of "Tricks With A Plastic Wonder," a manual for achieving better results with a Holga camera, available as an eBook from Amazon.com.

    written by Lorraine Healy on 2017-05-24 #gear #infrared #35mm #color #buenos-aires #gear #argentina #pentax-k1000 #wa #route66 #fpp #film-photography-project #infrared-color #holga-k280 #holga-k280-mod #whidbey-island


    Source: Color Infrared For Landscape And Urbanscape

    Tuesday, May 23, 2017

    Get a Fresh Start with Infrared

    Posted on May 17, 2017 in Featured, Panasonic

    Today's Post by Joe Farace

    I once received an e-mail from a reader asking "why do you do infrared photography, when regular photography is already so hard?" The sort answer is because it's fun. And yes, because it captures light that is invisible it can be challenging but if you use the search function on this blog (and our sister blog) looking for posts about "infrared" it will help take some of the mystery out of it.

    Your eyes usually see a range of light from approximately 400 to 700 nanometers. (A nanometer or nm is a metric unit of length equal to one billionth of a meter.) A digital camera's sensor sees light in wavelengths from 350 to 1,000nm. Most digital cameras have a low pass filter placed directly in front of the sensor that allows low frequency light  visible to the human eye to pass through to the sensor where it's captured but blocks unwanted light from infrared and ultraviolet spectrums, preventing them from polluting a photograph's color.

    caption: Shot with an IR-converted Panasonic Lumix G6 and 12-32mm lens (at 12mm) with an exposure of 1/250 sec at f/11 and ISO 400. Processed using the 'blue sky' technique explained here.

    If you have your camera modified for IR-only capture, the low pass filter is removed replacing it with a piece of optical glass that has a filter that only permits light of specific wavelengths to pass is installed. LifePixel, for example, offers several different filter options. For the image shown, it uses the Enhanced Filter that allows more color to pass and is especially suited for color IR photography with great saturation and color range. Black & White looks good too although with a bit less contrast without adjustments.

    If you would like to experience some of the same thrill of discovery that occurred during the first phase of your photographic education, my suggestion is that you never stop exploring. Try some new things. Maybe it's infrared photography but whatever you do try something that's outside your normal comfort zone. Stop taking the same picture over and over again and try something new.IR.book

    My book, The Complete Guide to Digital Infrared Photography is currently out-of-print but used copies are available from Amazon for under $15. Creative Digital Monochrome Effects has a chapter on IR photography and is available from Amazon with new copies under $6 and used copies for less than three bucks.


    Source: Get a Fresh Start with Infrared

    Monday, May 22, 2017

    Same Bird. Same Place. Same Lens. Same Photographer. Same Image? Amazing when you think about it ...

    What's Up

    I am feeling better still though I have a lingering, nagging, scratchy cough at times. I had a great time this weekend at DeSoto. Multiple IPT veteran Mike Hankes from Ormond Beach and newcomer Steve Olive from North Fort Myers joined me for the full program and Ray Jusseaume from Ellenton joined the three of us on Saturday morning. We had a load of fun. Much of it involved trying to do the impossible: make a killer image of one of the breeding plumage Sanderlings scurrying along the shore of the Gulf. Ray sat in one spot and waited for the birds to come to him with his tripod-mounted Nikon 600mm with the 1.4X TCE in place. Mike chased them down with his hand held 400 DO II with the 1.4X TC III and his 1D X II. I went with the 5D IV/1.4X III/5D IV combo on Saturday morning (after trying and failing with the 500 II/2X III/5D IV combo). I intended to work with the hand held 400 DO II/2X III TC/1DX II on Sunday morning but uncharacteristically left the DO in my motel room so I went w ith the 100-400 II/1.4X III/1DX II combo.

    We had lots of chances with Reddish Egret and breeding plumage Dunlins as well. I had not seen a Yellow-crowned Night-Heron in the park in about a year but we did well with a single bird on Saturday morning. After the nice sunrise on Sunday morning we were sucking dirty pond water for a while but I never give up. After trying and failing with several of my back-up locations we were facing strike three when we hit a home run with Sandwich Terns fishing in flight, tame Snowy and Great Egrets, and pelicans diving into huge schools of baitfish.

    Over the weekend, Dr. Gil Moe sold his 500 II, a 2X III TC, and his X-trahand Vest the first day it was listed. You can see all the current Used Gear listings by clicking on the Used Gear Page tab on the orange/yellow Tool Bar at the top of each blog post page.

    Gear Questions and Advice

    Too many folks attending BAA IPTs and dozens of folks whom I see in the field, and on BPN, are–out of ignorance–using the wrong gear especially when it comes to tripods and more especially, tripod heads… Please know that I am always glad to answer your gear questions via e-mail.

    Please Don't Forget …

    As always–and folks have been doing a really great job for a long time now–please remember to use our B&H links for your major and minor gear purchases. For best results, use one of our many product-specific links; after clicking on one of those you can continue shopping with all subsequent purchases invisibly tracked to BAA. Your doing so is always greatly appreciated. Please remember: web orders only. And please remember also that if you are shopping for items that we carry in the BAA Online Store (as noted in red at the close of this post below) we would of course appreciate your business.

    Advanced AF Technique

    With the strong backlight the system would not hold focus when I put the AF point on the bird. In situations like this I advise acquiring focus by putting the AF point on the bird's legs as they offer more contrast. As I wanted to tuck the bird into the lower right corner I pressed and held the AF-On button and then re-composed. It is sort of like rear button in reverse. My standard set-up has assigned AF lock to the AF-On button. When hand holding, the trick is to stay as still as possible once you have locked focus. This is never easy for me as I move a lot when I am standing still. To add to the difficulty, I was standing in mid-thigh deep water on a soft, muddy bottom. (Two of us had waded more than 150 yards to get into position …) I created about 40 very similar images. Only two were tack sharp due to the my inability to stay completely still. Folks will not encounter similar problems with static subjects when they are on a tripod.

    When the bird finally flew we waded back to the spit with as much care as we had on the way out 🙂

    This image was created on Saturday morning at Fort DeSoto with the hand held Canon EF 100-400mm f/4.5-5.6L IS II USM lens, the Canon Extender EF 1.4X III (at 560mm) and my favorite bird photography camera body, the Canon EOS 5D Mark IV. ISO 400. Evaluative metering +1/3 stop: 1/1000 sec. at f/9. AWB.

    LensAlign/FocusTune micro-adjustment: +7.

    Center Large Zone/Shutter Button/AI Servo AF was active at the moment of exposure. The system selected two AF points that fell on the bend of the wing. Though this would seem to be just ahead of the plane of the bird's eye the image was sharp enough.

    Image #2: Reddish Egret — crest raised head portrait Point Your Shadow at the Subject …

    This handsome breeding plumage bird landing right in front of us on Saturday morning. It danced, it posed, and then, as Reddish Egrets often do, it flew. We made our way around the marsh about 200 yards with all our gear. There were several photographers photographing the bird about 110 degrees off sun angle. We waded across a knee deep creek and looked for an opening. When we found one, the bird was right there, right on sun angle. We got as close as 10 feet without disturbing it in the least. It raised its crest when it spotted a baitfish. Then, as Reddish Egrets often do, it flew. High fives all around.

    This image was created on Saturday afternoon at Fort DeSoto with the hand held Canon EF 100-400mm f/4.5-5.6L IS II USM lens (at 371mm) and the blazingly fast, rugged Canon EOS-1D X Mark II DSLR Camera Premium Kit with 64GB Card and Reader. ISO 800. Evaluative metering +2 1/3 stops off the water: 1/1250 sec. at f/6.3. AWB.

    LensAlign/FocusTune micro-adjustment: 0.

    Strangely, even though Center Large Zone AF/AI Servo/Shutter Button AF was active at the moment of exposure, no AF points were illuminated when viewing the RAW file with AF points (Command J) checked under Preview … Strange indeed. Has anyone else run into this?

    Image #3: Reddish Egret, soft light flight What Happened to the 1.4X III TC?

    Why, in this situation, do you think that I remove the 1.4X III teleconverter?

    100-400 II Versatility …

    Here again, with today's three images, we see the incredible versatility of the Canon EF 100-400mm f/4.5-5.6L IS II USM lens. I often find myself using it for entire photo sessions even when I have the 500mm II or the 600mm II n the field with me. That happened often on the DeSoto In-the-Field Meet-up Weekend.

    Your Favorite?

    Which of today's three featured images do you like best? Be sure to let us know why you made your choice. Remember, the more folks who participate the more everyone learns, including me.

    palouse-card-2017layers

    Palouse 2016 Horizontals Card Why Different? Announcing the 2017 BIRDS AS ART Palouse Instructional Photo-Tour

    In what ways will the 2017 BIRDS AS ART Palouse Instructional Photo-Tour be different from the most other Palouse workshops?

    There are so many great locations that a seven-day IPT (as opposed to the typical three- or five-day workshops) will give the group time to visit (and revisit) many of the best spots while allowing you to maximize your air travel dollars. In addition, it will allow us to enjoy a slightly more relaxed pace.

    You will be assured of being in the right location for the given weather and sky conditions.

    You will learn and hone both basic and advanced compositional and image design skills.

    You will learn to design powerful, graphic images.

    You will visit all of the iconic locations and a few spectacular ones that are much less frequently visited.

    You will learn long lens landscape techniques.

    You will learn to master any exposure situation in one minute or less.

    You will learn the fine points of Canon in-camera (5D Mark III, 5DS R, and 7D II) HDR techniques.

    You will learn to create this look in Photoshop from a single image while winding up with a higher quality image file.

    You will be able to share a variety of my exotic Canon lenses including the Canon EF 11-24mm f/4L USM lens and the Canon EF 8-15mm f/4L Fisheye USM lens, aka the "circle lens."

    You will learn to use your longest focal lengths to create rolling field and Urbex abstracts.

    You will learn when and how to use a variety of neutral density filters to create pleasing blurs of the Palouse's gorgeous rolling farmlands.

    As always, you will learn to see like a pro. You will learn what makes one situation prime and another seemingly similar one a waste of your time.

    You will learn to see the situation and to create a variety of top-notch images.

    You will learn to use super-wide lenses both for big skies and building interiors.

    You will learn when, why, and how to use infrared capture; if you do not own an infrared body, you will get to borrow mine.

    You will learn to use both backlight and side-light to create powerful and dramatic landscape images.

    You will learn to create the very popular detailed, slightly grungy, slightly over-saturated look in Photoshop.

    palouse-2017-card-layers

    Palouse 2016 Verticals Card The 2017 BIRDS AS ART Palouse Instructional Photo-TourJune 8-14, 2017. Seven full days of photography. Meet and greet at 7:30pm on Wednesday, June 7: $2,499. Limit 10/Openings: 5.

    Rolling farmlands provide a magical patchwork of textures and colors, especially when viewed from the top of Steptoe Butte where we will enjoy spectacular sunrises and at least one nice sunset. We will photograph grand landscapes and mini-scenics of the rolling hills and farm fields. I will bring you to more than a few really neat old abandoned barns and farmhouses in idyllic settings. There is no better way to improve your compositional and image design skills and to develop your creativity than to join me for this trip. Photoshop and image sharing sessions when we have the time and energy…. We get up early and stay out late and the days are long.

    Over the past three years, with the help of my friend Denise Ippolito, we found all the iconic locations and, in addition, lots of spectacular new old barns and breath-taking landforms and vistas. What's included: In-the-field instruction, guidance, lessons, and inspiration, my extensive knowledge of the area, all lunches, motel lobby grab and go breakfasts, and Photoshop and image sharing sessions. As above, there will be a meet and greet at 7:30pm on the evening before the workshop begins.

    To Sign Up

    Your non-refundable deposit of $500 is required to hold your spot. Please let me know via e-mail that you will be joining this IPT. Then you can either call Jim or Jennifer at 863-692-0906 during business hours to arrange for the payment of your deposit; if by check, please make out to "BIRDS AS ART" and mail it to: Arthur Morris/BIRDS AS ART, PO Box 7245, Indian Lake Estates, FL, 33855. If you have any questions, please feel free to contact me via e-mail: artie.

    Travel Insurance Services offers a variety of plans and options. Included with the Elite Option or available as an upgrade to the Basic & Plus Options. You can also purchase Cancel for Any Reason Coverage that expands the list of reasons for your canceling to include things such as sudden work or family obligation and even a simple change of mind. You can learn more here: Travel Insurance Services. Do note that many plans require that you purchase your travel insurance within 14 days of our cashing your deposit check. Whenever purchasing travel insurance be sure to read the fine print carefully even when dealing with reputable firms like TSI.

    Please Remember to use my Affiliate Links and to Visit the New BAA Online Store 🙂

    To show your appreciation for my continuing efforts here, we ask, as always, that you get in the habit of using my B&H affiliate links on the right side of the blog for all of your photo and electronics purchases. Please check the availability of all photographic accessories in the New BIRDS AS ART Online Store, especially the Mongoose M3.6 tripod head, Wimberley lens plates, Delkin flash cards and accessories, and LensCoat stuff.

    As always, we sell only what I have used, have tested, and can depend on. We will not sell you junk. We know what you need to make creating great images easy and fun. And please remember that I am always glad to answer your gear questions via e-mail.

    I would of course appreciate your using our B&H affiliate links for all of your major gear, video, and electronic purchases. For the photographic stuff mentioned in the paragraph above, and for everything else in the new store, we, meaning BAA, would of course greatly appreciate your business. Here is a huge thank you to the many who have been using our links on a regular basis and those who will be visiting the New BIRDS AS ART Online Store as well.

    Amazon.com

    Those who prefer to support BAA by shopping with Amazon may use the logo link above.

    Amazon Canada

    Many kind folks from north of the border, eh, have e-mailed stating that they would love to help us out by using one of our affiliate links but that living in Canada and doing so presents numerous problems. Now, they can help us out by using our Amazon Canada affiliate link by starting their searches by clicking here.

    Facebook

    Be sure to like and follow BAA on Facebook by clicking on the logo link upper right. Tanks a stack.

    Typos

    In all blog posts and Bulletins, feel free to e-mail or to leave a comment regarding any typos or errors. Just be right :).


    Source: Same Bird. Same Place. Same Lens. Same Photographer. Same Image? Amazing when you think about it ...

    Wednesday, May 17, 2017

    Get a Fresh Start with Infrared

    Posted on May 17, 2017 in Featured, Panasonic

    Today's Post by Joe Farace

    I once received an e-mail from a reader asking "why do you do infrared photography, when regular photography is already so hard?" The sort answer is because it's fun. And yes, because it captures light that is invisible it can be challenging but if you use the search function on this blog (and our sister blog) looking for posts about "infrared" it will help take some of the mystery out of it.

    Your eyes usually see a range of light from approximately 400 to 700 nanometers. (A nanometer or nm is a metric unit of length equal to one billionth of a meter.) A digital camera's sensor sees light in wavelengths from 350 to 1,000nm. Most digital cameras have a low pass filter placed directly in front of the sensor that allows low frequency light  visible to the human eye to pass through to the sensor where it's captured but blocks unwanted light from infrared and ultraviolet spectrums, preventing them from polluting a photograph's color.

    caption: Shot with an IR-converted Panasonic Lumix G6 and 12-32mm lens (at 12mm) with an exposure of 1/250 sec at f/11 and ISO 400. Processed using the 'blue sky' technique explained here.

    If you have your camera modified for IR-only capture, the low pass filter is removed replacing it with a piece of optical glass that has a filter that only permits light of specific wavelengths to pass is installed. LifePixel, for example, offers several different filter options. For the image shown, it uses the Enhanced Filter that allows more color to pass and is especially suited for color IR photography with great saturation and color range. Black & White looks good too although with a bit less contrast without adjustments.

    If you would like to experience some of the same thrill of discovery that occurred during the first phase of your photographic education, my suggestion is that you never stop exploring. Try some new things. Maybe it's infrared photography but whatever you do try something that's outside your normal comfort zone. Stop taking the same picture over and over again and try something new.IR.book

    My book, The Complete Guide to Digital Infrared Photography is currently out-of-print but used copies are available from Amazon for under $15. Creative Digital Monochrome Effects has a chapter on IR photography and is available from Amazon with new copies under $6 and used copies for less than three bucks.


    Source: Get a Fresh Start with Infrared

    Friday, May 12, 2017

    With help of infrared photography, institute hopes to repair timeworn Tlingit drum

    Arts and Entertainment

    A detail of a Tlingit shaman's box drum is seen above. Sealaska Heritage Institute has secured a grant from Museums Alaska to conserve and make infrared scans to reveal the original design and construction of the box. (Sealaska Heritage Institute)

    A timeworn Tlingit shaman's box drum dating back to at least the late 1800s may get new life.

    The nonprofit organization Museums Alaska just granted Sealaska $3,868 to get the repatriated object in exhibit-worthy condition and have it scanned by an infrared photographer.

    The leader of the T'akdeintaan Clan loaned the instrument to the Sealaska Heritage Institute in Juneau in 2016.

    "It's a very old piece that is deteriorating so the clan is interested in putting it in a facility like ours that can look after it," said Sealaska History and Culture Director Chuck Smythe, who added the drum is most likely made of red or yellow cedar.

    "We're excited to learn more about this very old, unique object. There aren't many of these drums in the northern Tlingit area."

    The drum had mystical meaning, according to Tlingit-American art collector Louis Shotridge, who acquired the object in 1924 for the University of Pennsylvania Museum of Archaeology and Anthropology.

    "He reported that it was originally a shaman's drum and represented the time when a T'akdeintaan shaman 'proved his spiritual power,'" Smythe said. "It was carved to represent his helping spirit, 'Old Man of War.'"

    Bringing the drum back to how it looked in the days when the shaman played it isn't Sealaska's aim.

    "We don't want to restore it because it has a life of its own," Smythe said. "All we want to do is what we can to have it live as long as it can in its current condition."

    Sealaska has enlisted Skagway-based conservator Nicole Peters, who is currently  conserving objects for the Anchorage Museum expansion and new Alaska Exhibition, to assess and lightly clean the drum and offer treatment suggestions.

    Revealing the underlying colors and form-line design will be the job of Brian Wallace, a former Juneau Empire photographer.

    The Tlingit box drum with SHI History and Culture Director Chuck Smythe, Ron Williams of the T'akdeintaan Clan and his wife Julie, and Robert Starbard of the T'akdeintaan Clan. Sealaska Heritage Institute has secured a grant from Museums Alaska to conserve and to make infrared scans to reveal the original form-line design. (Sealaska Heritage Institute)

    "We are hoping the infrared photographs will show what the original painted surfaces looked like," Smythe said. The infrared scans "will penetrate the layers and pull out the pigment."

    Right now, the drum "is uniformly dark to black all around," Smythe said. "You can see there's a design on it but its very difficult to make out what it is."

    Until Peters and the photographer arrive, Smythe and his colleagues are striving to keep the box drum intact. At the moment, they have to lay it on its side to stabilize it.

    "Some of the edges are deteriorating and we're worried that it will break along the corners if we stand it up," Smythe said. "If it's stabilized, something could be put in it and we could stand it up, which would be much more realistic."

    The project should be completed by this fall, Smythe said.

    If all goes according to plan, the box drum will be housed in Sealaska's permanent exhibit, "Enter the World of the Tlingit, Haida, and Tsimshian Peoples," in the Nathan Jackson Gallery in the Walter Soboleff Building in Juneau.

    Smythe and his colleagues do have a good idea of how the original box drum looked, thanks to German geographer and author Aurel Krause.

    Krause sketched the drum during a visit to Hoonah in the late 1800s, and the drawing is in his book "The Tlingit Indians: Results of a trip to the Northwest Coast of America and the Bering Strait."

    "We know it was made before 1882 because that's when it was seen by Krause, so its got to be older than that," Smythe said.

    But Krause's sketch doesn't tell the whole visual story. It's in black and white and only shows the drum from one angle.

    "We don't even know if it's the same image on both sides," Smythe said.

    Krause's encounter with the drum was just the beginning of the object's complicated story.

    Shotridge collected it in 1924, and six decades later it became part of a campaign to repatriate nearly 50 items back to Alaska from the University of Pennsylvania.

    In the late 1990s, The T'akdeintaan Mt. Fairweather House, with the help of organizations including the Hoonah Indian Association, Huna Totem Corp., Huna Heritage Foundation and Sealaska, fought to retrieve the objects.

    In 2010, the parties argued before the Native American Graves and Repatriation Act Review Committee that Shotridge's 1924 acquisition of the box drum and other objects was illegal because the T'akdeintaan Clan never agreed to sell the objects.

    A year later, eight of the pieces were returned, including the box drum. The clan is still waiting for the rest.

    "Under Tlingit customary property ownership law, these objects belong to the clan, not to an individual, and an individual does not have the right to alienate (sell) them without permission from the clan as a whole," Smythe said. "Somehow, Louis Shotridge acquired the items in 1924, but there is no bill of sale or other instrument that identifies who sold them. This remains a mystery."

    For more newsletters click here


    Source: With help of infrared photography, institute hopes to repair timeworn Tlingit drum