Pages

Friday, June 30, 2017

Going infra-red

One of the regular readers has moved into infra-red photography, and gave us the benefit of his experiences.

Dear Harry, about 2 months ago I took up Infrared photography using a converted Lumix DMC GX8 with 12-60mm lens, I had the camera converted to take infrared pictures at Protech Photographic in Uckfield, Sussex, UK.

I taught myself how to take and process the pictures from the Internet, and in post 14, give a step by step guide as to how I process my images.

This is not a right or wrong way to process them, but is the way I treat mine, it may not achieve the result you want, but this is how I started and I am learning from here.

Firstly download the NIK Collection, available here:

https://www.google.com/nikcollection/ in a drop down box.

And also download the faux color swap:

https://kolarivision.com/post-infrared-photo-editing/automated-false-color-action-for-photoshop/

As above, both will attach themselves automatically in Photoshop. I have minimized the NIK Collection and clicked on to the actions button/arrow, the color swap I have imported 4 times to make it easier to see, it comes up as InfraRed. Adjustments, the window can be closed when not needed.

Open NIK Selective Tool in its drop down box and chose Define 2, click it and wait for it to work. When it has finished working click save. You will then be asked what options you want to save the picture.

Next click Viveza 2 in the NIK Selective Tool menu, here is now where you have to decide what do in the brightness, contrast, saturation and structure slides. At this point do not worry about color, when happy with the image press OK, let the program work then press save. To keep things easy I keep the same picture number but add Viv (Viveza) to it.

Now minimise the NIK selection tools box and open the color swap menu in actions, click InfraRed adjustments.

Now the fun starts, click the Master box, choose whatever colors you feel need adjusting and slide away, remember you are adjusting the whole picture, when happy with the result click OK then close the slide box.

Open Viveza 2 again, click Add Control Point, then move the control point to where you want it to be. I start with the sky, and by using the slide open out the area I want to effect. Next adjust other parameters using the slides. You will only be adjusting what is in the circle or part of it, the area nearest the control point being strongest the effect weakening as the distance increase from the control point.

For my next control point I started on the tops of the trees on the right hand side, basically just continue playing with control points until you are happy with the picture.

Run Define 2, when it has finished working, click Layer in the top menu bar and at near the bottom of the list click Flatten Image, save the image, again I use the picture number but add FINN.

Your image displayed, on the left hand side there is a box that has 30 or so presets, scroll down, and chose one you like.

I am pleased in the main part with the images I have. The main thing to do is experiment at every step and remember I have only just scratched at the surface of what is possible,

I like it, just one other small thing, to make the images smaller for use on the web page I use Obviousidea Light Image Resizer. It works every time and have used it for years. It can resize one or hundreds of images at one go. The camera I use is a Lumix DMC GX8 with 12-60mm lens. Feel free to comment or if you have any questions please ask away, but I am not an expert, just someone that has discovered the fascination of infrared photography.

Thank you very much for your experiences in IR photography. My experiences were in the days of very sensitive film and very fiddly! This electronic method looks to be much better. If anyone would like to contact Stanley, here is his contact email: [email protected].


Source: Going infra-red

Thursday, June 29, 2017

Infrared: Process or Not Process

Today's Post by Joe Farace

"Why do you shoot infrared, when regular photography is already so hard"—question from a reader.

My feeling is that infrared photography is as difficult as you want to make it. For example, I was surprised there was a SOOC movement within the world of infrared photography.

Out of the box, an IR-converted camera will produce RAW and JPEG files that look almost identical having a heavy magenta cast as can be seen in left-hand image below. If you take the time to create a custom white balance for your converted camera, you will end up with JPEG images that look like the right-hand half of the below image, with a blue color cast that intensifies or lessens depending on the image's IR content. It is this aesthetic that the SOOC people seemed to have embraced with open arms, perhaps because they see this version as the purest form of infrared capture.

As someone who has been shooting infrared imagery since the film days, I prefer to use a monochrome approach to processing IR image files. What I do is forget about custom white balance and set the Photo Style menu to Monochrome but set capture options to RAW+JPEG. This setup gives me a preview in the viewfinder and LCD screen that's black and white, while retaining the magenta-hued RAW file for conversion using Silver Efex Pro.

An approach that mixes bluer hues with monochrome is possible when using filter choices such as LifePixel's Enhanced IR that I had done to my Panasonic Lumix G6. One again, you end up with a magenta-hued RAW file but by using simple processing techniques show here, you create an image that is black and white and blue all over.

All of this is a roundabout way of saying that your approach to processing infrared images is just that—yours. The discipline of shooting infrared photographs is an inclusive one that welcomes all kind of ways to process—or not process—their imagesIR.book.

My book, The Complete Guide to Digital Infrared Photography is currently out-of-print but used copies are available from Amazon for under $17. Creative Digital Monochrome Effects has a chapter on IR photography and is available from Amazon with new copies under $6 and used copies for less than three bucks.


Source: Infrared: Process or Not Process

Wednesday, June 28, 2017

Wordy Wednesday #448: “DG Leica Zoom in Infrared”

McCabe Meadows is located near Parker, Colorado along the west side of Parker Road just north of Indian Pipe Lane and the Country Meadows subdivisions. This park includes a trailhead with access to Cherry Creek Trail, a fitness circuit, a shade structure with tables and public restrooms. The Parker Arboretum is also located here. Because of the large number of deciduous trees, it is also the best place near Daisy Hill to make infrared images, which is why I hold the Infrared Workshops there.The above image was shot at McCabe Meadows with a Panasonic Lumix G6 converted to infrared-only capture by LifePixel. Lens was the Leica DG Vario-Elmarit 8-18mm f/2.8-4 ASPH lens with an exposure of 1/200sec at f/11 and ISO 400. As you can see when shot at 8mm, as in the above image, you can experience some pincushion distortion if the lens in not held level. In this case I was shooting from a low angle handheld, but more careful and level placement of camera and lens at this focal length should minimize this effect.

For more information about this lens, see my post on our sister blog Mirrorless Photo Tips: "First Impressions: Leica DG Vario-Elmarit 8-18mm f/2.8-4 ASPH lens ."

IR.bookMy book, The Complete Guide to Digital Infrared Photography is currently out-of-print but used copies are available from Amazon for around $16. Creative Digital Monochrome Effects has a chapter on IR photography and is available from Amazon with new copies under $6 and used copies for less than three bucks.

Related


Source: Wordy Wednesday #448: "DG Leica Zoom in Infrared"

Monday, June 26, 2017

6 Ideas for More Creative Landscape Photography

In the following article, you will learn how to do creative landscape photography using a variety of different techniques.

The level of technical skill in photography these days is amazing. A quick Google search for any given location will show well-composed photos, taken during the correct lighting conditions, and edited to perfection. The number of people capable of taking these perfectly crafted photos is also increasing, and therein lies the problem. The number of people with similar photos diminishes all the others when placed together. What's the solution to this? If you still want to take a photo of a particular landscape consider other creative approaches to photographing it.

So what's the solution to this? If you still want to take a photo of a particular landscape consider using some other creative approaches to photographing it. Read on for six ideas to help you do better and more creative landscape photography.

6 Ideas for More Creative Landscape Photography - long exposure

This photo has used a long exposure to flatten the water. It's also the same image used for the 360-degree panoramic image below.

#1 – Infrared Photography

Infrared photography is great fun to experiment with and has been around along time. This particular form of photography uses, as the name suggests, infrared light to capture images. Now you can't see the infrared spectrum with your eyes, but your camera sensor or special infrared film can.

When using a digital camera you will either need to adjust the White Balance in camera or use post-processing to bring out the signature infrared look (note you can also get an old camera body converted especially for capturing infrared images). What is the infrared look? These photos have dark black skies, bright white foliage and often they have still water caused by a long exposure. In order to take this type of photo with a digital camera you will need a filter or a reconditioned camera.

6 Ideas for More Creative Landscape Photography - infrared

Infrared is a lot of fun if you're prepared to put the time into learning this technique.

#2 – Aerial Photography

One of the best angles in photography is a high angle looking down, this can lead to some great creative landscapes. The advances in drone technology have seen many people take amazing photos from the sky, though the consumer-level drones still don't produce the highest quality still images. There are a few options if you want to try out aerial photography yourself.

  • Airplanes – Yes get the window seat of your plane, and take photos from the sky. Ensure you have a high shutter speed, remember you're plane is moving fast so you need a fast shutter speed to get a sharper image.
  • Drones – The consumer drone will get you great angles, and images with good enough quality for online sharing, but not for printing. The professionals use larger drones that allow their dSLR to be attached to them.
  • Hot air balloons – It's a great experience to take a hot air balloon ride, and the photos can be incredible. Even more extreme is attaching a camera to a weather balloon, and sending it up almost into space!
  • 6 Ideas for More Creative Landscape Photography - aerial photo

    A great angle if you can get it is overhead for a creative landscape. This photo was taken from a hot air balloon, but a drone would also get an angle like this.

    #3 – Refraction

    The concept of refraction to use light bent through a glass object is essentially how your lens puts an image onto your camera sensor. You can create this effect with spherical glass objects, or even ones filled with water. The image inside the refracting object will be upside down, and a vast amount of the scene behind the ball will be captured.

    This is an interesting way to capture a creative landscape because the image inside the ball the image has the characteristics of a fisheye lens. Using a lens with a long focal length will compress the scene.

    6 Ideas for More Creative Landscape Photography - refraction

    This scene of St Paul's Cathedral was captured inside a crystal ball, using the refraction technique.

    #4 – Shoot a 360-Degree Panorama

    This creative landscape idea utilizes post-processing to create a tiny planet effect. The effect is similar to the refraction idea, in that you are creating a globe, however, the look is very different.

    To create this photo you will need a panoramic landscape image. If you're a purest, then the panoramic landscape will be created by rotating the camera through 360 degrees. Once you have your panorama it needs to be reformatted into a square image, flipped upside down, and then the polar coordinates filter should be applied in Photoshop. To find this filter go to filter > distort > polar coordinates.

    6 Ideas for More Creative Landscape Photography - 360-degree pano

    This photo was turned into a tiny planet. It has the feel of a 360-degree panoramic photo.

    #5 – Long Exposure

    The different types of images that are possible with long exposures will lead to a burst of creative landscape photography. All you need is a tripod, and a camera capable of taking long exposure photos. The effect of long exposure is to make things move. The main subjects are car light trails, water, and cloud movement. Now, of course, astrophotography is also long exposure, but you'll learn about that next.

  • Car light trails – These are produced by taking photos that are generally five seconds or longer. An overhead angle from a bridge or tall building is often best for shooting car trails, but photos from street level also look nice.
  • Water – Anywhere there is moving water, a long exposure can look nice. When photographing waterfalls the white water becomes like silk, with exposures over two seconds. The sea and its waves can be flattened by using long exposures over 10 seconds.
  • Cloud movement – Clouds moving across the sky make for a dreamy look in your photo, to achieve this you'll need lots of clouds, with some clear sky. The faster the clouds move the easier it is to capture this movement. A sturdy tripod is important here, clouds move faster on windy days, so you need the camera to be still.
  • 6 Ideas for More Creative Landscape Photography - long exposures

    It's a lot of fun to play creatively with traffic light trails in a photo. The photo of Big Ben in London is a popular one.

    #6 – Astrophotography

    One of the most popular forms of photography for those interested in landscapes is astrophotography. The latest cameras help you capture starry skies, with better noise performance at high ISO levels. Recent excursions to the deserts of Dubai and the coastline of southern England revealed a phalanx of photographers interested in this kind of photography. The most popular types of astrophotography are capturing the Milky Way, or showing the rotation of stars around the pole.

  • The Milky Way – Positioning the Milky Way in your frame can create a dramatic and creative landscape photo. This is the subject of a whole different article. The basics are to shoot at the constellation of Sagittarius between March and October in the northern hemisphere. Use the largest aperture you have, with exposures generally being 25 seconds long, and an ISO of 6400 or greater.
  • Star trails – The aim here is to point your camera at the north or south pole, and capture the earth's rotation during a long exposure. The photo can be an ultra long 15-minute exposure or a series of shorter ones. The best method is to take multipl30-secondnd exposures, and then stack them together. StarStax is a good piece of software that will help you create this type of photo.
  • 6 Ideas for More Creative Landscape Photography - Milky Way

    Shooting the Milky Way is hard to photograph, so the chance of your photo being more unique is higher if you can do it.

    Which creative landscape will you make?

    There are many creative landscape photography ideas, which one will you choose to try out? There are other ideas we'd love to hear about as well, how did you make a creative scene your own?

    In this article, I stuck strictly to still photos, but experiments with video allow for time-lapse or cinemagraphs as well. Please share your examples of the above styles that you've done, and tell us why and how you create your shot.


    Source: 6 Ideas for More Creative Landscape Photography

    Sunday, June 25, 2017

    Photography and Friendships

    Picture

    One of Russell Grace's stunning infrared images

    It's Sunday morning and as usual, once the sun comes up whatever sleep I still need is put on the back-burner. Whatever happened to those days when I was younger and could easily sleep until noon? 

    As I sat down to write Sunday Morning Reflections, next to my computer were three small prints (one of them above) from our friends Russell and Angela Grace. They were gifts that came with the return of my Hasselblad X-Pan I loaned Russell.  At that time I shared a post about their fine art business and Russell's infrared photography.

    So, that got me thinking about a statement I've shared over and over again:

    "The best part of this industry has nothing to do with photography,but the friendships that come out of everyone's love for the craft!"

    This week was pretty remarkable when it came to kicking off new friendships and sustaining old ones.
  • Jenn Smith, from AIBP, shared a remarkable post on building trust with boudoir clients, but the best part of the post was getting to know Jenn through the behind the scenes phone and IM conversations on Facebook. Plus, I was introduced to Jenn, thanks to Erin Zahradka, found of AIBP and another artist who's become a terrific friend over the years.
  • My long time buddy Brian Malloy chased me down. He's always watching my back. One of his images just won some incredible recognition ($5000) in the Naples Art Association exhibition! I know it's sappy, but when friends get the recognition they deserve, you can't help but feel proud!
  • Picture

    Brian Malloy's winning image

  • My good buddy, Matthew Jordan Smith, who was just here at the house two weekends ago, finally made it home to Japan after being on the road for a few months with a very successful workshop tour. Thanks to the Internet, the world is a smaller place and twice this week I caught up to him on Facebook IM's. And, it gets sappy again when I feel a certain relief for friends who finally get home safe and sound.
  • Then there's Brad Walsh, who I can't remember how or where we met. A round of IM's and a phone call to talk about the fact he's given his resignation and is about to go full time into photography got me living vicariously through his dream of building his business.
  • Suzette Allen shared a terrific guest post on my weekly series for Photodex. She always comes through and this week shared eight short videos about creative ways to capture summer experiences. The fun of working with Suzette isn't just about her expertise as the "Queen of Hybrid," but the friendship I have with her and her husband Jon, and that pulls in another group of good friends along with Tom Curley and Panasonic's Luminary team.
  • Steve Rosenbaum and I go back to my very first days at Hassselblad thirty years ago!  This week we caught up for one of our marathon conversations about the industry. He's also 1/2 of the story about my incompetence when it comes to social media and the perfect way to bring today's post to a close.
  • I was on my way home from a board meeting at a non-profit I'm active with here in Sarasota. I was listening to Classic Rock and the Steve Miller Band was on. I heard the lyrics, "...I really love your peaches, want to shake your tree!" Well, being the crazy fun-loving husband I am, I texted those words to my wife, Sheila, letting her know I was on my way home. Well, the response came from Steve, "I'm not sure you meant this for me!"  My last text to Steve was in my phone's history right next to Sheila's. Oops!

    This blog post is too small a window to list everybody who had an impact on my life this week, but the snipets above represent what I cherish most about our industry, the friendships. Friendships are the foundation of, as sappy as it might sound, why I feel so blessed to have this career.

    I might work solo out of my home office, but thanks to the Internet and the phone, my days are filled with great friends, new ideas and one adventure after another.  And on that note - it's time to wish everyone my traditional eleven-second make it a great Sunday hug. If you're tuning in late, according to an article I read years ago, hugs lasting eleven seconds are therapeutic - so make them longer and enjoy them!

    Most important of all - let those special friends in your life know how important they are to you. Life is too short to not share the love you have for them.

    Happy Sunday everybody and thanks for being in my life!

    Family isn't always blood.It's the people in your life who want you in theirs;the ones who accept you for who you are.The ones who would do anything to see you smile and who love you, no matter what.Author Unknown
    Source: Photography and Friendships

    Thursday, June 22, 2017

    A Cinematic Infrared Timelapse Based on the Dramatic Beauty of Salzburg

    6/22/2017 ISO 1200 Magazine 0 Comments

    Inspired by the moody B&W long exposure photography using ND filters (usually of architecture), I really wanted to capture this kind of dark aesthetic, but in timelapse motion. However, this style of photography requires an intense level of post-production on a single image using hundreds of luminosity masks – so I decided to see if I could achieve a similar look & feel through infrared photography. I converted a Sony A6300 with a 830 NM filter through Lifepixel.com (who I really recommend btw). converted infrared Sony A6300

    Probably much to the dismay of timelapse purists, I prefer to shoot 4k video and simply speed it up in post. I'm just trying to speed up all my workflows and increase my creative output, and I've found this to be the quickest workflow.

    Apart from that, it's really just a matter of weather, waiting for the right clouds & light, and finding the right spot!

    Thanks for your help Matt.

    About Matt Rycroft: Hi, I'm Matt Rycroft. I'm a filmmaker & content creator based in Salzburg, Austria. I'm fascinated by all things film & photography – please feel free to get in touch with any questions or queries.  Let's Get Connected: www.matthewrycroft.com 

    Text, image and video via Matthew Rycroft

    SUBSCRIBE Get Latest Videos,Promotions & Exclusive Offers Via Email:

    We don't send spam!


    Source: A Cinematic Infrared Timelapse Based on the Dramatic Beauty of Salzburg

    Wednesday, June 21, 2017

    A Mozart-Inspired Infrared Timelapse Shot with a Converted Sony a6300

    In this stunning 3-minute infrared timelapse, director and filmmaker Matthew Rycroft sought to answer the question: 'What would a Mozart music video look like?'. The result is a dramatic 3-act cinematic opera titled "Siege of Salzburg," and filmed in the city of Mozart's birth.

    Rycroft shot the time-lapse entirely on a Sony a6300 camera specially converted for full spectrum infrared (830nm) photography, creating a unique and theatrical deep contrast black-and-white film, which perfectly complements Mozart's "Lacrimosa".

    He shot 3TB of infrared footage around Salzburg over the course of a year – from daily life in the city to beautiful images of the Alpine surroundings and threatening clouds blossoming high over Hohensalzburg Castle. The infrared imagery particularly emphasises the dark moody skies over Salzburg.

    "I hoped the infrared aesthetic and 3-act structure would add a slightly different dimension to the typical time-lapse video," Rycroft tells PetaPixel.

    For more of Matthew Rycroft's work, you can visit his website, Instagram, and Twitter.

    Image credits: Video and photographs by Matthew Rycroft and used with permission.


    Source: A Mozart-Inspired Infrared Timelapse Shot with a Converted Sony a6300

    Monday, June 19, 2017

    28 Awesome Links That Are Like Candy for Photographers

    So much has been going on in the field of photography this week, and here we find that Toad Hollow Photography has been busy searching in all corners of the internet to find the best tutorials, special features and great photography to share with everyone.  This weeks list is comprised of a wide variety of topics, with something sure to be found here for everyone.  We really hope you enjoy checking out this weeks list as much as the Toad did in bringing it to you.

    TUTORIALS

    This is Why Long Exposure Photography is So Appealing – this primer is posted here on Light Stalking and discusses the power and effect that can be achieved when using long exposure times in photography. Awesome sample shots are included with the key concepts being discussed here, giving you instant visual feedback regarding the results you can expect in your own work.

    The National Guard

    The National Guard

    An Introduction to Digital Infrared Photography – the world of digital infrared digital photography is exposed for everyone in this terrific post that is peppered with great samples to show you what to expect. Various aspects of this technique are covered, from the hardware used to capture the frame, all the way to the post-production that creates the finished result.

    The Phoblographer Answers: Do Professional Photographers Use TTL? – this is a question I also encounter in the world of photography, with people coming from both camps expressing their thoughts on the application of TTL in flash photography. This brief post covers this topic and presents good arguments on both sides of the fence.

    How to Pose People and Get Great Expressions in Headshot Photos – this terrific article also includes an 8 minute video presentation full of tips and tricks for how to work with people as subjects and get the best out of them. Oftentimes it can be daunting for people to stand in front of a camera and be photographed, particularly if they don't do it often. These tips and tricks will help you put them at ease, and the results will reflect that.

    John Walker LRPS

    John Walker LRPS

    How To Start A Successful Photography Business – trying to build a professional photography practice can be a daunting process if you don't have a clear game plan to follow. This article discusses some of the basics required to become successful in the field of professional photography, and is sure to help you get started on your own practice.

    6 Tips to Shoot Like the Pros – a quick set of tips is shared in this brief post that talks about some of the things that professionals do in their practice to help them produce consistently great results. This post will definitely help you get started on the road to your own successful practice.

    Food for digital Thought: It's not what you put in a picture that counts, it's what you don't put in that matters – what in reality is a simple compositional tip, this concept will help you see the entire frame as you work on your photograph and will ensure that it contains what you want, and doesn't include any extraneous elements that detract from the final picture.

    SPECIAL FEATURES

    This is the Oldest Known Production Nikon Camera in the World – check out this set of photographs of the oldest known production Nikon camera in the world today. The camera is in astonishing condition, having been part of a private collection. It's terrific to see this classic camera like this.

    Patrick Emerson

    Patrick Emerson

    GREAT PHOTOGRAPHY

    La casita – Juan Pablo de Miguel shares a very dramatic shot here that finds the night sky over a house that has some lights on, creating a strong sense of artistic tension. The wood construction of the house creates a perfect accent for this composition that also uses the still reflection in the pool of water in the foreground to create further visual cues that draw the viewer in.

    Martyn Fletcher

    Martyn Fletcher

    Battersea Power Station's control rooms – the fan of urbex themed images will love this post that shows 5 photographs of the power station and control room as it is today, just before the developers come in and tear it all down leaving the entire complex to live on in the photographs that people have taken over the years. The art-deco themed design of the machines and control panels create a strong sense of nostalgia, making for a space that I wish I could have visited personally.

    Wind Fox – this beautiful photograph comes to us from H Atala and features a profile of a red fox as it walks across a frozen snow-covered landscape. The wonderful details in the fox is highlighted by the shallow depth-of-focus to isolate it from it's backdrop, making it pop out of this portrait and come alive on our screens.

    Garden Key Light – Dry Tortugas National Park, Florida – Len Saltiel takes us to an unfinished fort on the Florida Keys that dates back to the early 1800's. The incomplete brick facility is bookended by a dramatic black lighthouse that exudes artistic tension as it stands and looks outward to the ocean.

    Fly – Stefano Ronchi delivers a stunning portrait of an owl mid-flight as it flies almost straight towards the camera. Stefano's shot was taken just as the wings of the owl are in their downward position, creating a great feel to this shot that reveals its spirit in the context of a frame.

    Michael D Beckwith

    Michael D Beckwith

    goldener reiter – peeling wallpaper, tattered curtains, a gutted piano and a beheaded rocking horse are all found in this spectacular urbex location that features the decaying remains of a living room. Photographer Ltblue takes us all back in time in this space, a space that has been unused for many years.

    Higher Reflecting – the true power of reflections in a composition is explored in this stunning shot by Bryson Gibbons that reveals the city sitting far below in half the frame as the reflection of the buildings cover the remaining part. The red hue of the glass of the reflective surface creates a bit of an illusion at first, beckoning you into the picture where all becomes clear as you separate the reflection from its source.

    Stella and Leonard – Lisa Gordon frames a series of beautiful flower macros with a pair of shots at the beginning of the post that features an incredible snow-covered walkway, creating an instant paradox that leaves you feeling as if you've experienced two seasons in one sitting. The wonderful flower shots of her orchids reveal a color palette that can only be found in nature.

    To The Ends Of Everywhere – The Narratographer creates a minimalistic image with this shot that utilizes a long exposure time to turn the waters that dominate the image into a silky textured cover while using the wood piers the peer above the waterline as a leading line. As you follow the piers into the frame, beautiful colors in the sky in the distance highlight the incredible vanishing point expressed in the composition.

    Arran Bee

    Arran Bee

    The Colors of Buenos Aires – shapes and lines from the native architecture of this Argentinian city are covered in vibrant colors, highlighting the textures and details of the scene. Barbara Youngleson also includes a weathered bench in the foreground, acting as an anchor into this abstract looking shot.

    Flying Fox – the Flying Fox is a highly unusual creature that strongly resembles a large bat, as shown in this great photograph by Michael Cleary that showcases one as it flies in the general direction of the camera. As the Fox flies, its wings scrape the top of the water, creating a cascade that follows it along, adding a great element to this photograph.

    Dana

    Dana

    Reserved Seating – very little of the original auditorium is as it was many years ago in this amazing urbex shot from Michael Criswell. Years of decay and weathering have taken their toll in this place, leaving us all straining to hear the voices of the children who once filled this space with laughter and joy.

    Old Tree Branch – a long exposure creates a great feature that frames a long dead tree trunk as it lies in the shallow waters near the shore. Rossano Ferrari's shot also finds subtle colors in the sky in the distance with layers of mountains adding a wonderful compositional element.

    Hongcun, China – join Anne McKinnell as she takes us to a place in China that sits at the base of the Huangshan Mountains. The terrific architecture of this place finds harmony in its setting, capped off perfectly with a gorgeous shot of a lotus sitting in the still waters.

    Aaron Hawkins

    Aaron Hawkins

    Archangel – natural ice formations in the icy waters form the anchor in this shot, leading to Daniel Kordan's descriptive title that is based upon the shape of the dominant formation. The surrounding landscape is covered in thick snow, accenting the frozen feel this image shares with everyone to sees it.

    Red Van – Andy Hooker (LensScaper) uses selective color to create this terrific shot that features a rolling landscape with a ribbon of road with a red van making it's way through the setting. The dash of vibrant red in the frame draws your eye right to the van, and then you start to explore the surroundings and take in the finer details it exposes.

    goro memo

    goro memo

    UNESCO World Heritage: Windmills of Kinderdijk – a beautiful warm color palette is expressed in this landscape shot that features the incredible windmills of the region. The waters that wander through the land create a still mirror-like reflection, creating a compelling element that adds to the image.

    The Grand Prismatic Basin – Yellowstone National Park provides a plethora of photography opportunities with many natural features that are unique to this park and the region it sits in. Scott Wood uses the wide range of colors that the geysers of the park create in the landscape against a backdrop of a forest that seems to jump out of the horizon.

    Barry Dale Gilfry

    Barry Dale Gilfry

    The last sail – artistic tension is explored in this shot that finds the front hull of a forgotten boat sticking out of thick snow cover in this frozen landscape. Daniel Kordan also reveals an incredible frozen landscape under muted light in a scene that shares a glimpse of the Antarctic that leaves you with many unanswered questions as to the source of the forlorn boat.

    Pyrrhuloxia Photo – Ron Niebrugge captures a stunning portrait of a colorful male Pyrrhuloxia sitting on the end of a twig covered in buds that are bursting in color. The terrific details of the birds profile reveal its full natural beauty, creating an instant favorite that nature lovers will enjoy.

    The following two tabs change content below. Latest posts by Toad Hollow Photography (see all)
    Source: 28 Awesome Links That Are Like Candy for Photographers

    Wednesday, June 14, 2017

    GOA - Through Photographer's Eye (Infrared Photography Series)

    Last year I visited Goa with my friend Tanvi Sharma, the very first thing my friends questioned was that what am I going to do in Goa because neither I drink, neither I go to the clubs. That very instant I realised how their level of perspective is based on false judgements.

    Through my Infrared series I am going to share that how a photographer sees cities. It really doesn't matter to a photographer what others do in the same area as they find their own taste and shots in any place. Mostly people believe its a party place but as a photographer my perspective is totally different which made Goa even more beautiful and intriguing for me. The problem is that before even visiting Goa we make a pre judged identity of what others think it is which limits our creativity to explore the other side of this magnificent place.

    On this trip I not only clicked but also enjoyed and had fun in the most well known clubs of Goa without consuming alcohol. For me finding a new frame is more crucial than anything else. I see every location first as a frame and then when I finally fulfil my hunger for different shots, I relish. I believe It's hard to find people with similar interests. I haven't really found anyone as mad and addictively passionate towards photography as I am. I prefer to travel alone at times so that I can enjoy my own company and interests without any interruptions.

    I explored the south part of Goa. The best thing was that I travelled off season so the places were not crowded. I was lost in my own thoughts and observations while sitting in the shacks, sipping coke or juice and watching the beautiful sunset was truly enchanting which leads to a world of imagination and ideas to shoot.

    Always keep in mind that there are no excuses for a photographer. Take it as a challenge and the location itself will decide the level of photography. Every region is magnificent be it a slum, street, haunted house, a beach, a desert or the hills. Experience the magic yourself and make your photos fascinating.

    Location: Goa

    Camera: Nikon D3000 (720nm Infrared Converted) 

    Lenses: Nikon 50mm f/1.8G, Nikon 18-55mm f/3.5-5.6 and Rokinon 14mm f/2.8.

    You can check normal DSLR shots by searching #Goa_Nimit hashtag.

    How To Reach Goa: Airport: Goa International Airport (GOI) Railway Station: Madgaon (MAO)

    Thank you Ocean Residency for the great hospitality. You can convert your camera into Infrared Red from Kapil Inderjeet Vohra, Delhi.

    Follow me on Instagram for more Travel and Astro Photographs. Check Youtube for Hyperlapses, Timelapses, Unboxing, Reviews and Video Diaries.


    Source: GOA - Through Photographer's Eye (Infrared Photography Series)

    Tuesday, June 13, 2017

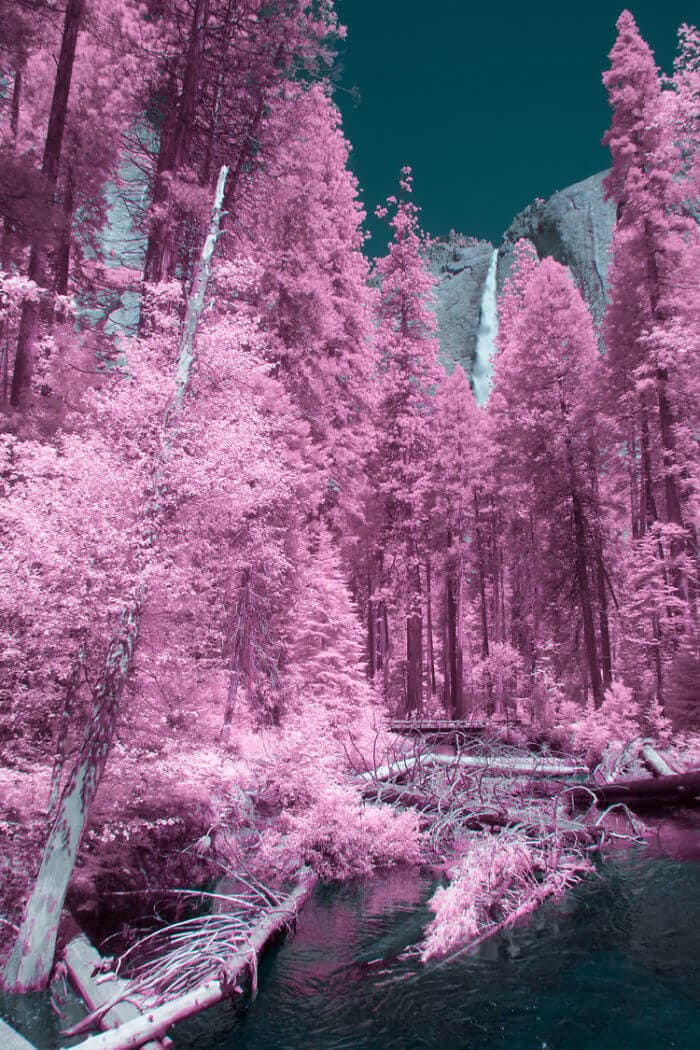
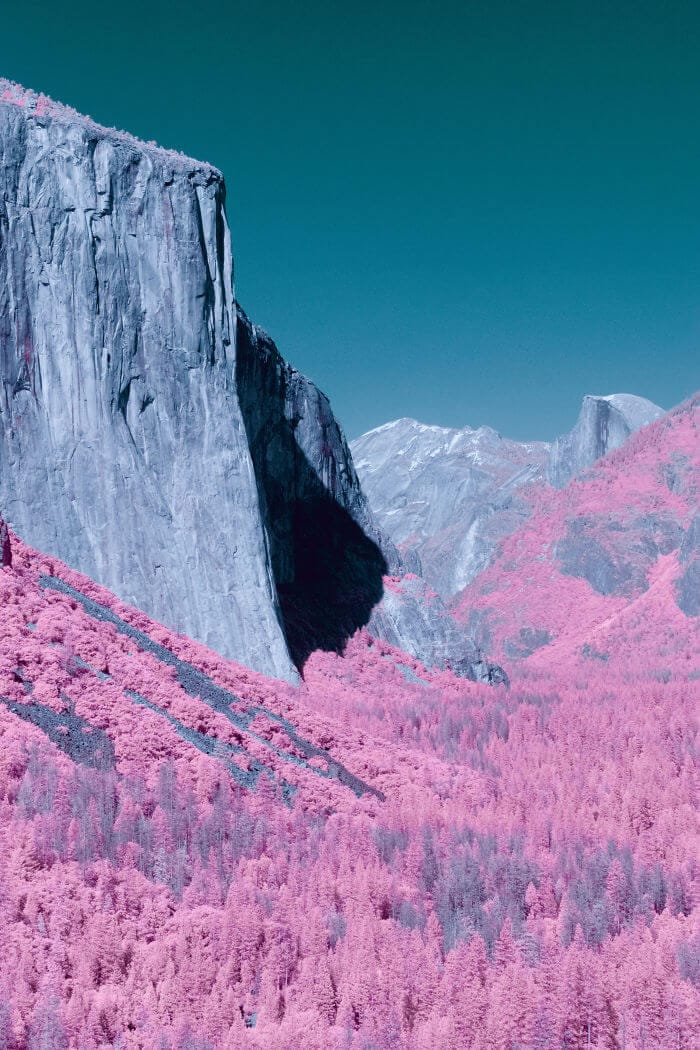
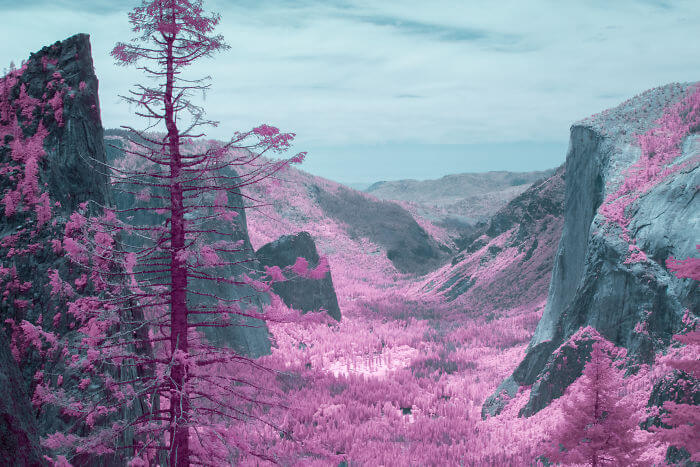
    These haunting infrared images will make you see Yosemite in a new light

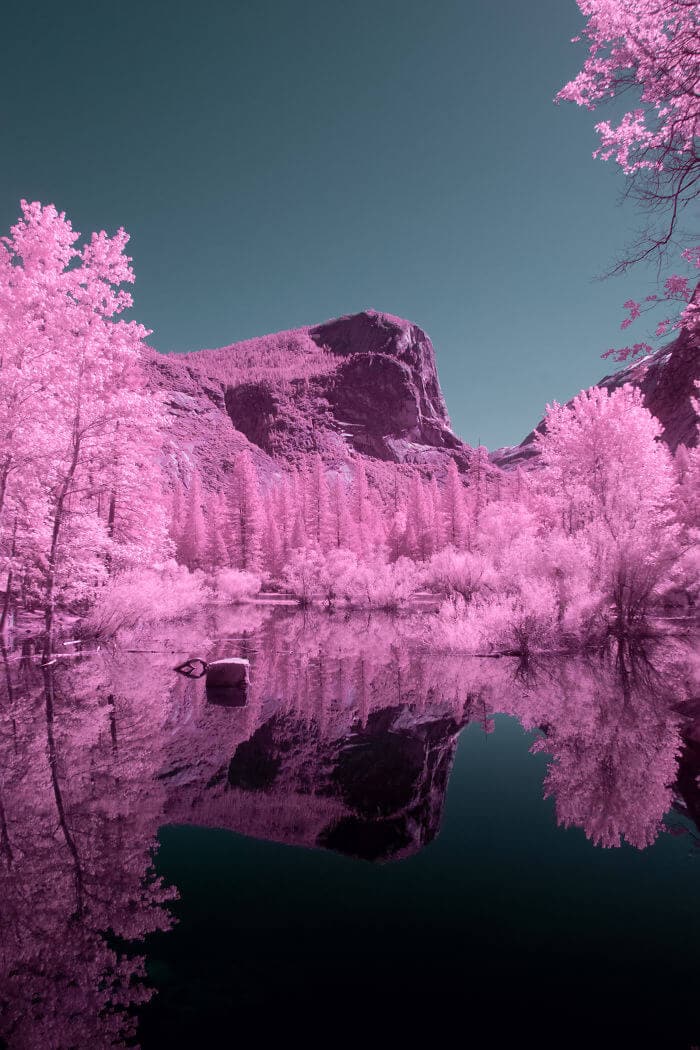
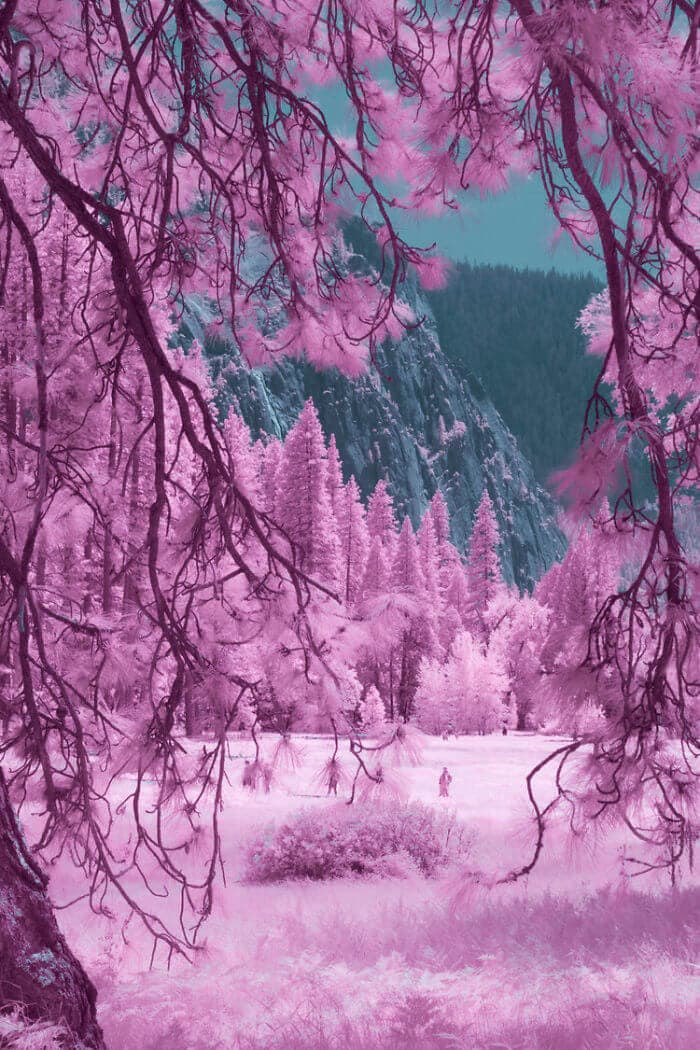
    Though countless pictures of California's iconic Yosemite Park have been taken over the years, we can guarantee you've never seen it like this. Photographer Ryan Berg has managed to capture the space in a completely new – and hauntingly beautiful – way. Using infrared photography, he developed this surreal series of pink-hued shots that look like they're from another planet.

    Yosemite captured using infrared photography. Yosemite captured using infrared photography. Image by Ryan Berg

    "I'd been planning this project for quite some time", Ryan told Lonely Planet. "I realised that infrared photography could transform anything into a new visual experience. Yosemite is one of my favourite places in the world, and I felt that capturing it in infrared would be an excellent way to showcase its beauty in a different way."

    The park takes on a haunting pink hue.The park takes on a haunting pink hue. Image by Ryan Berg

    As he explored the park with his camera, he wasn't sure how the shots would turn out. "Infrared photography can be pretty tricky with regards to lighting", he explains, "so I wasn't exactly sure how the images would look. The weather ended up being perfect one evening up at Glacier Point, with the clouds rolling in. This resulted in some very surreal images that I had no idea would become part of the aesthetic."

    A familiar scene, presented in a strange new way.A familiar scene, presented in a strange new way. Image by Ryan Berg

    Simultaneously recognisable and strange, the images are completely compelling. What is it about the series that has captured people's imaginations? "I think that presenting something familiar, but in a completely new way allows people to view the world differently" says Ryan. "Yosemite, as stunning as it is, has been photographed countless times. So, I think creating images that are out of the ordinary provides a fresh take, and allows for people to question what they're seeing."


    Source: These haunting infrared images will make you see Yosemite in a new light

    Saturday, June 10, 2017

    Exposing For Infrared Light

    Because of the nearly white reproduction of most vegetation's chlorophyll, infrared black-and-white photographs render landscapes as if they were glowing, moonlit, or immersed in an extraterrestrial light.

    Because exposure meters either hand held or in-camera are not sensitive to infrared light, it's difficult to calculate exact exposures but that doesn't mean you can try, especially with IR-converted digital cameras that provide instant feedback.

    Two subjects that appear equally bright in visible light might reflect infrared radiation at significantly different rates and have different brightness when captured with an IR-converted camera or by using infrared filters. My Panasonic Lumix G5 converted for IR-only capture was used to make the above photograph and it tends to slightly underexpose even though the image on the LCD looks perfect. And histograms aren't always a good indication either.

    When getting started in digital IR photography it's a good idea to bracket a series of three to five different exposures because you can't count on your LCD screen giving you the kind of result you'll see when viewing the files on a calibrated monitor. Most cameras offer a built-in bracketing function but even if your camera doesn't have a bracket function it should have an Exposure Compensation feature that will let you adjust exposures on one-half or one-third stops while in the various automatic exposure modes.

    If all fails, most cameras offer a manual mode and you don't need a hand held exposure meter to get started in manual mode. Typically I look through the lens and see what the suggested exposure is in Program mode, then transfer that shutter speed and aperture to the camera after it's set in manual mode. You are now free to change shutter speed or aperture to bracket exposures just like in the good ol' days.

    IR.bookMy book, The Complete Guide to Digital Infrared Photography is currently out-of-print but copies are available from Amazon for around $14. Creative Digital Monochrome Effects has a chapter on IR photography and is available from Amazon with new copies under $6 and used copies less than three bucks, which is a heckuva deal.

    Related


    Source: Exposing For Infrared Light

    Friday, June 9, 2017

    How Do You Conserve Art Made of Bologna, or Bubble Gum, or Soap?

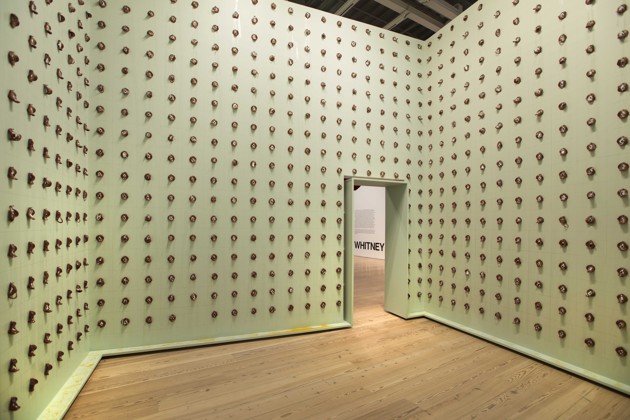
    Art critics noted the stink as soon as the elevator opened. Indeed, the morning of the Whitney Museum of American Art's Biennial preview, Pope L.'s contribution smelled like rotten lunch. For good reason: Claim, on view through June 11, consists of 2,755 bologna slices nailed in grid formation on the walls of a small, freestanding room within the exhibition.

    Plastic basins catch the grease run-off along the museum floor. By early April, nearly a month later, the stench had faded considerably and in May, it seemed gone, as the bologna dried—or "cured" per ArtNews—into something probably more akin to beef jerky now. Claim considers the usefulness of race as a social category: Affixed to each piece of meat is a photocopy of someone who may or may not be Jewish. According to the Whitney's label, the number of slices reflects 1 percent of the Jewish population in New York. Or not. The math, we're told, is a "bit off"— a deliberate misrepresentation that doesn't actually correspond to census data, the pictures taken at random. What, the artist is asking, makes us think we can recognize Jews—or any other identity—with certainty? On June 2, Pope L. received the Whitney's prestigious Bucksbaum Award, which grants one Biennial participant— whose work demonstrates a "singular combination of talent and imagination" — a future museum exhibition.

    Installation view of Pope.L aka William Pope.L, Claim (Whitney Version), 2017. Whitney Biennial 2017. (Bill Orcutt)

    But among the questions it presents, Claim, more than other artwork in the Biennial, stresses the unique problems museums and collectors face as contemporary art grows more ambitious in its materials: how to conserve works made of substances meant to last for several days or weeks. After all, it's difficult to imagine bologna portraits transcending millennia like a classical marble bust or centuries like a Rembrandt. Getting a sculpture made of deli meat to survive the decade could even be a stretch. While Claim may be an extreme case of perishable art, Pope L. is far from alone. Today's art world is filled with artists using seemingly banal, yet wacky household items— from a miniature Algerian town made of couscous to a huge Styrofoam cup cloud— elaborate, significant work that challenges not only what art is, but how exactly, future generations will be able to experience it.

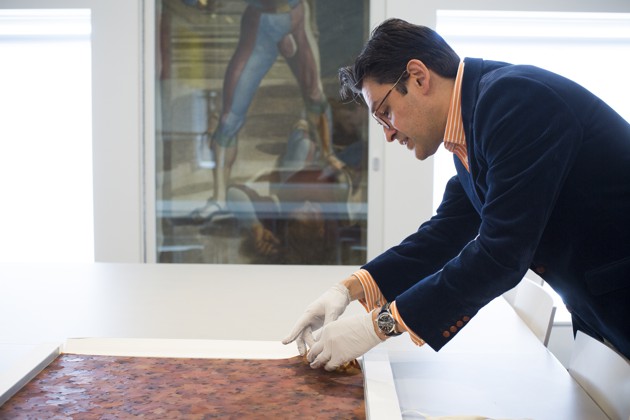
    That conservators play a pivotal role in art history is a given. The Metropolitan Museum of Art's department of scientific research includes researchers with backgrounds in chemistry, biology, geology, and engineering. The director of the Straus Center for Conservation and Technical Studies at the Harvard Art Museums, Narayan Khandekar, has a Ph.D. in organic chemistry, with post-graduate training at London's Courtauld Institute of Art. A conservator's goal, he says is to ensure that viewers appreciate the art, rather than get distracted by the damages. But conservation decisions can stir up controversy both in and outside the art world. On a busy day, for example, nearly 20,000 tourists can stream through the Sistine Chapel, according to The New York Times, trekking dirt particles and humid air with them, slowly degrading the paint on the ceiling's artwork. In 1990, after much debate and public scrutiny, a team of restorers completed a major cleaning of Michelangelo's f rescos. Ironically, the restoration might be too good. Some people worried that the chemical solvent, AB-57— a gelatinous substance that Vatican assistants applied to the 16th-century masterpiece and then wiped off with distilled water—produced sharper colors than the artist's original artwork.

    Narayan Khandekar, director of the Straus Center for Conservation and Technical Studies at the Harvard Art Museums, examines a piece composed entirely of rose petals.(Stephanie Mitchell / Harvard)

    And artists have long had a love affair with new, malleable materials, making conservation more challenging. Polymer-based artwork especially has vexed conservators of 20th-century art. Anyone who's left a water bottle in the car too long can attest that light and heat degrade the molecular structure of plastic or resin.

    Meanwhile, replacing an outdated part—like a 1960s florescent tube in one of Dan Flavin's light installations—has also forced curators to decide what is an acceptable change after an artist dies, explains Don Thompson, author of The Orange Balloon Dog: Bubbles, Turmoil and Avarice in the Contemporary Art Market. The structure of light bulbs are different now and certain colors have been discontinued, Thompson says, raising questions about which materials can substitute for the original without compromising an artwork's legitimacy. Flavin, a minimalist pioneer, was known for using readily available, mass-produced items as a matter of principle, such as light bulbs he purportedly bought on Canal Street in Soho. His intent was to create sculptures from ordinary hardware store materials, knowing they would eventually become obsolete.

    But the transient nature of some of the most recent artwork is distinctive: These artists are using products that are meant to decompose rapidly by design. For this segment of 21st-century art, museums are consciously conserving art as it's created. Now, scientists must invent ways to preserve the most tenuous of materials, rather than simply restoring pieces to their original—or most authentic—luster.

    Even seasoned buyers can be caught unaware by how much contemporary work is made of materials that deteriorate quickly, says Emily MacDonald-Korth. She is the founder of Art Preservation Index, a kind of Standard & Poor's for the art market that issues a durability report on a painting or a sculpture's likelihood of technological obsolescence. Fragility is a particular concern as art prices continue to break records: What precisely are private collectors and museums acquiring? How long will their investments last? Brooklyn artist Dan Colen, for example, is famous for using bubblegum to create textured "paintings." His freestyle technique and faintly bad boy persona have drawn comparisons to Jackson Pollock. "Is it bubblegum, or is it an abstract painting using bubblegum?" he's said of his work. And while the contemporary art market can be fairly opaque, in 2010, a piece from Colen's gum period titled S & M sold at Phillips auction house for over half-a–mi llion dollars. Philanthropists Rosa and Carlos de la Cruz own multiple pieces of his work that they share with the public at their contemporary art space in Miami. At first, as Colen told The New York Times writer Carol Vogel, he and his studio assistants "just started chewing"— everybody would have to do it "all day long." Still, they couldn't produce enough material, yielding only three paintings in a year. So he started heating the gum to the right consistency instead, which then hardens and dries on the canvas like paint.

    But think about the science of gum, says MacDonald-Korth. Mouths are normally somewhere in the range of 90 degrees Fahrenheit; a stick also softens around eighty degrees in a person's pocket, she adds. In her experience, if the painting's atmosphere approaches that temperature— say an HVAC system malfunctions— the gum can sag or fall off completely. She also cautions that Colen's paintings may sprout biological growth like mold, and drip "sugar-based exudates" that attract bugs and ants. Size might play an important preservation role too. Smaller bubblegum paintings at the de la Cruz collection, I've noticed, aren't as pungent, while the sugary smell of one of Colen's larger works overtook a Chelsea gallery exhibit last spring, and it's easy to imagine insects flocking to it. Art made of chocolate can similarly attract pests, according to MacDonald-Korth, in addition to secreting a white material that "looks terrible." Researchers call this chemical proce ss "fat blooming"— a harmless white defect you might notice on unopened chocolate months after Halloween— caused by lipids that migrate and then crystalize on the candy's surface.

    "The list goes on and on," MacDonald-Korth says. "I bet you can ask me about any food in existence and I'll tell you at least three significant concerns. Food drastically changes in composition over time." By her estimate, a Colen gum painting has a shot at weathering 25 years, if kept under strict environmental controls. Yet she believes its appearance will likely change significantly. The wads of gum might fade or darken, or shrink and crack, which could be visually or conceptually pleasing to some viewers who consider the metamorphosis part of Colen's aesthetic. After all, these aren't paintings; they're abstract artworks made from bubblegum. And in MacDonald-Korth's evaluation, it's highly doubtful the work can withstand a century.   

    * * *

    "With contemporary art, any material goes," says Kate Moomaw, a conservator of modern and contemporary art for the Denver Art Museum. For more traditional materials there are more established methods of conservation. For instance, like its peer institutions, the Denver Art Museum occasionally transports sculptures to the Denver Health Medical Center for hospital X-rays to evaluate the internal structural integrity of their pieces. "Like other museum conservation departments, we use diagnostic tools, microscopes, UV light, and infrared photography," Moomaw says. But with new artists, every work can present novel technical issues that may not have a scientific or artistic precedent. So conservators of contemporary art, especially, must draw upon their general chemistry training and principles of the scientific method to conjure experimental solutions as problems arise.

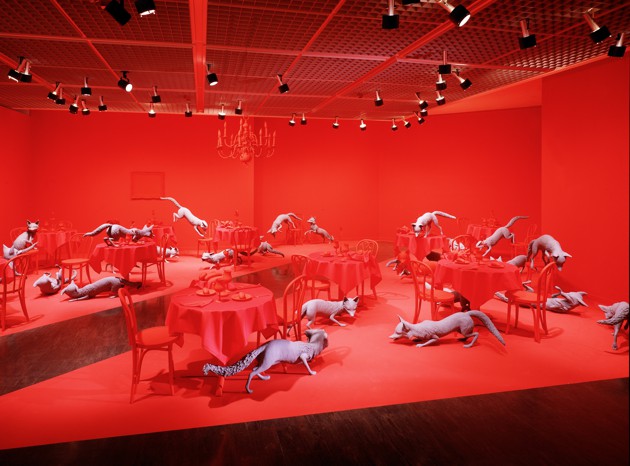
    To illustrate, Moomaw described her approach to Denver Art Museum's installation by Sandy Skoglund, called "Fox Games"—a deeply saturated red restaurant tableau with 28 gray foxes, cast in polyester resin (a material conservators are well-versed in by this point).

    Sandy Skoglund, Fox Games, 1989 (The Denver Art Museum)

    But Skoglund created a unique preservation challenge by incorporating real food within Fox Games: 15 bread baskets containing 124 dinner rolls and breadsticks, all painted red. "We've noticed the bread has become very brittle and in some cases and fallen and broken apart," said Moomaw. Fortunately, Skoglund included extra bread for the museum when it acquired her work. But the spare parts won't last forever. One of the strengths of contemporary art, however, is that the artist is often still alive and museums can devise preservation strategies with their input. In this case, Moomaw constructed prototypes for Skoglund's approval, anticipating the future, when the exact rolls are no longer available. To develop her samples, Moomaw obtained bread in the same shapes as those in the artwork and dried them in a low heat oven before "impregnating [the prototypes] with a synthetic resin to strengthen and preserve them." Although ideally, she hopes to eventually take molds di rectly from Fox Games and create resin bread casts, for a more permanent solution.

    In contrast, some carbohydrates might last forever. In late May, I visited the de-installation of Hauser & Wirth's LA's most recent gallery show, a survey of Jason Rhoades, who's known as a "maximalist" artist, building striking installations from materials like neon signage and power tools. In the piece, "My Brother / Brancusi,"  created for the 1995 Whitney Biennial, Rhoades included approximately 1,500 small donuts, which assistants were packing in plastic and wooden crates during my interview. But the donuts haven't been replaced since the work was created, Rick Baker, the manager of the Jason Rhoades estate, told me. If they do deteriorate in the future, Baker explained that the estate has the recipe to replicate them, although he believes the donuts' MSG are likely protecting the art from decay.

    However, living artists, can be surprised by how their work ages. That's one of the reasons, the Smithsonian's Hirshhorn Museum and Sculpture Garden has an artist interview program—to anticipate future problems, Gwynne Ryan, the Hirshhorn's chief conservator, explains. Artists share insight about the materials they use and their conceptual perspective: What is the piece meant to communicate? What would be a tolerable substitution?

    "Lick and Lather," acquired by the Hirshhorn Museum in 2001, is an example of this practice. Janine Antoni, widely considered a contemporary art master, created a series of self-portrait busts, Lick and Lather—one from chocolate, the other from soap. The National Gallery of Art has a complete set of fourteen Antoni chocolate and soap works, displayed on white pedestals (often museums display one of each). Antoni created the original sculptures in 1993 for the Venice Biennale, and then, as she did with each subsequent Lick and Lather, licked the chocolate bust and showered with the soap one to erode their features. But according to an article in Smithsonian Magazine, sometime between 2004 and 2008, the Hirshhorn's soap bust began to decay, developing "problematic-looking white crystals on its surface," while the chocolate one produced the "the same whitish tinge that a chocolate bar does when it's been around for a while." Antoni described herself to me as a young artist when she made "Lick and Lather." "I was engaged in the ideas of the work and felt the materials were necessary to communicate the meaning I was intending," she said. "I realized the work was ephemeral, but I had very little knowledge of conservation issues."

    In fact, it was soap, not chocolate, that presented the thornier scientific puzzle for the Hirshhorn. There is, according to Ryan, a book conservators use now: From Marble to Chocolate: the Conservation of Modern Sculpture. But while the busts appear uniform, Antoni's soap supplier had indeed delivered different soap formulations, so "Lick and Lather" versions do not age consistently. Soap, Ryan explained, consists of water, fat, and lye (or sodium hydroxide). X-ray florescence— a chemical analysis for solids, liquids, or powders— revealed that the "puffy material" on the Hirshhorn's "Lather" bust was a product of excess lye. In response, Ryan's team formulated 16 types of soap, which they subjected to various conditions— UV light, high humidity, high temperature — and then compared them to a control soap group, which was stored in a stable environment, a dark, archival, non-acid box of 70 degrees, 50 percent humidity. After a few months, they sent the mo st stable soap sample to Antoni's studio, and she replaced their "Lather" for them. "I'm not concerned with the specific type of soap or chocolate," Antoni told me, when asked about curators likely being unable to obtain the precise variety of soap or chocolate in a hundred years. "That said, the material should not be altered to the degree that it is no longer chocolate or soap. Or, she says, she might as well have used a material like bronze to begin with.

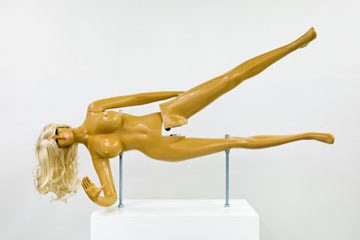
    At the same time, there are contemporary artists who deliberately create their art with the future in mind, though that might not be evident to the naked eye. Jennifer Rubell is known for her feminist take on interactive sculpture that encourages visitors to physically engage with her work. For instance, she's made a series of Nutcrackers from prefabricated female mannequins.

    Lysa, 2011 (Courtesy Adam Reich Photography and Jennifer Rubell)

    Viewers place a nut in the mannequin's inner thigh, push her upper leg down to crack it open, and eat it in the exhibition space. According to Rubell, the work embodies two polar stereotypes of female power: the sexualized nude and the "nut-busting uberwoman." But she says she always thinks about how her art will last in a museum for the next century or more. In her view, the fact that people touch her sculptures doesn't necessarily make them more fragile. "I take it as a moral imperative to make work that is reasonably durable, that will withstand human interaction," she explains. "Just as a painter might prepare his canvas properly or make sure to use materials that will not self-destruct." It is for that reason, Rubell told me, that each Nutcracker is actually a heavy-duty cast of the original prefab mannequin, and made of much thicker fiberglass, to increase its long-term strength.

    After all, as several conservators I spoke with noted, every museum object was once contemporary. But the demand for restored art may be a more recent phenomenon. The art historian Maxwell Anderson has directed five museums, including the Whitney, and as he explains in his book, The Quality Instinct: Seeing Art Through A Museum Director's Eye, it's only in the last century-and-a-half that we've developed an aversion to states of ruin. "We either want it old but intact, or new," he writes. "No imperfections need apply." Inevitably all art decays, even that most age-old of mediums—paint: Mark Rothko's murals have had notorious fading issues. But 21st century artists who use bubble gum and baloney are reflecting a new pace of flux. Today, our art, like our phones or disposable fashion, seems to become rapidly outmoded— designed for extinction. Perhaps art that deteriorates almost as soon as its made evokes the emotional frailty we, as viewers, experience in a worl d of constant obsolescence.


    Source: How Do You Conserve Art Made of Bologna, or Bubble Gum, or Soap?

    Thursday, June 8, 2017

    These Infrared Photos of Yosemite Looks Like Another Planet

    Infrared images can make the landscape look just like a surrealist masterpiece. But when an infrared camera is switched on an already-incredible landscape, the results are stunning.

    Ryan Berg shot this sequence of landscapes throughout his recent trip to Yosemite. The infrared result is dreamy, rendering the iconic park as an alien planet.

    As dark skies stretch over-head waterfalls crash into boulders and foliage spreads across cliffs.

    Not in the fascinating visual results used for artwork, infrared photography can also be used to measure the health of crops, creating the environment of those photos particularly intriguing. The rose colors are camera-generated visualizations of infra-red light along with the many strengths of green.

    The stronger, the more healthy the plant, the red color.


    Source: These Infrared Photos of Yosemite Looks Like Another Planet